How to Install Under Cabinet Lighting: A Guide from DEKOR®

DEKOR® NOSEEEM Strip Lights installed under kitchen cabinets

Under cabinet lights are useful in a wide variety of applications. They light up kitchen counters and surfaces. They make it possible to see what you have on your cabinet shelves in the dark. And they’re a great way to add some indoor accent lighting to areas of your home you may not initially think to light up. 

There are also a wide variety of fixtures you can use to light the space inside of and below your cabinets. Strip lights are a classic solution. A light bar might also be to your taste if you’re looking for a sturdy light with an adjustable angle. Of course, you can also install disc spot lights, directional spot lights, and other light fixtures to create different under cabinet lighting effects.

In this article, we’ll focus on two of DEKOR®’s most popular under cabinet lighting products: the NOSEEEM Strip Lights and our Under Cabinet LED Light Bars. We’ll walk through installation instructions for each product, step-by-step. You’ll quickly see how easy it is to install your own under cabinet lighting.


How to Install Under Cabinet Strip Lights

DEKOR NOSEEEM Strip Light and Installation Materials

The versatile NOSEEEM Strip Light (also available in a kit) can be used in a number of applications. Here, we’ll talk about installing it under cabinets, but you can also install it inside cabinets, on top of cabinets, on steps, on the underside of stone caps, indoors, outdoors, you name it. Follow these steps to install strip lights under your cabinets.

  1. Determine the precise positioning of the first NOSEEEM Light Strip under your cabinet before you start. 
  2. Mark the intended location of the screws. Use at least 3 screws per light strip. 
  3. Pre-drill screw holes with 1/16″ drill bit.
  4. Attach the mounting bar with included adhesive strip ONLY unless conditions require you to use screws. 
  5. Slide the light strip onto the mounting bar.
  6. Secure the light strip with small sections of the retaining cord. 
  7. Repeat the steps with each additional section until you have installed the desired length of light strip. If desired, you can cut light strips to fit custom lengths, but this will terminate power at the end of the light strip.
  8. Connect the first NOSEEEM Light Strip to the transformer or power supply with a cable. Then connect every additional light strip with Plug N Play cables. 

If you’re more of a visual learner, watch this installation video for DEKOR NOSEEEM LEDs.


How to Install Under Cabinet Light Bar

DEKOR® 20″ LED Under Cabinet Light Bar Kit in White


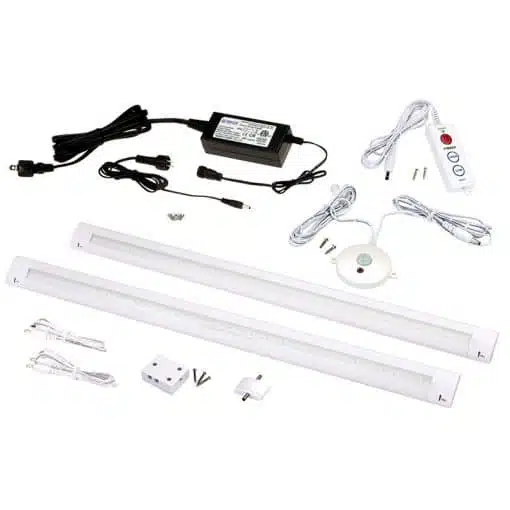
Light Bars are another classic option for under cabinet lighting. While they can’t be customized quite as easy as strip lights to fit unique lengths and small spaces, they do come in a variety of different sizes. DEKOR® sells light bars in both 12″ and 20″ sizes, both available for individual purchase and in kits.

Follow the next steps to install your light bar under a cabinet.

  1. Decide whether or not you’d like to install a dimmer and/or motion control for your light bar. The 12″ Light Bar Kit and the 20″ Light Bar Kit both come with a dimmer and a motion control device included.
  2. Determine the desired location of your transformer. You’ll want easy access to the transformer in case you need to service it for any reason.
  3. You may want to pre-drill holes for the cables or wires to run through the bottom of cabinets or between cabinets.  
  4. Each light bar has a mounting bracket. Open the bracket to 90 degrees. Then attach the mounting bracket to the underside of the cabinet with included screws.
  5. Plug the light bar into the outlet or power supply, then tip the bracket to your desired angle. The mounting brackets are adjustable and can ratchet to shine exactly where you want them to. 

DEKOR®‘s Top-Quality Under Cabinet Lighting

DEKOR® is the best option for your under cabinet lighting needs. Our LEDs are perfectly suited for indoor use: you will be amazed by the cabinet lighting projects you’ll be able to complete with our products. Find lights for under, over, and inside cabinets here. We offer not just strip and light bars, but also spot lights, disc lights, and more.

FAQs

Yes, DEKOR® manufactures all circuitry in Denver, CO providing excellent quality.

DEKOR® offers a COLORKONNECT WiFi controller and through the app you can dim the lights, change colors, and set schedules. You may also control light colors with dimming capability manually on the front face of the COLORKONNECT WiFi device.

When using the COLORKONNECT WiFi controller app provides you the ability to control your lights regardless of where you are located.

The 3W4PORT splitter/repeater has two functionalities: the splitter is used to connect the power wire and the three additional ports for 2-3 lights based on your lighting plan. The repeater is to be used every 20’ with long cable runs and at the light connections to enhance the signal creating pure colors from the first light to the last.

DEKOR® offers a simple 3W4PORT Plug-N-Play system with various cable lengths to make the install easy in any application.

You may change colors and dim the lights manually on the COLORKONNECT device.

Yes, with the use of two or more COLORKONNECT WiFi controllers and wiring two or more zones will deliver different light color patterns.

You may power up to 60-watts of light usage or 28 individual lights.
Our lights are 46% brighter and we have a dedicated pure white channel.
We offer a variety of lengths for any application—20”, 5’, 10’ and 20’.

Yes, you can add to your current non-RGBW DEKOR® lighting system by adding RGBW lights!  While the non-RGBW DEKOR lighting system is a 2-wire direct current system, and the RGBW DEKOR lighting system is a 3-wire direct current system, you are able to integrate both systems by creating a separate zone.  Either using a splitter running from you current transformer or upgrading to a 100 or 200 watt transformer, which has more than one output from the transformer, you can create an additional zone or zones.  Please call us if you need us to walk you through this!

The transconnect cable is for our standard DEKOR® Lighting 2-wire lights. The COLORCONNECT WiFi controller is a 3-wire system. The male-to-male cables come in lengths of 20”, 5’, 10’, 20’ are to be used to connect the COLORCONNECT WiFi controller and then to your first light.

For our RGBW system: The 36-watt and the 60-watt transformers will include one (1) 20’ 3WPNP male-to-male cable. The 100-watt transformer will come with (1) transconnect cable and (1) 20’ 3WPNP male-to-male cable. The 200-watt transformer will include (1) 20’ transconnect cable with two lead wires and (1) 20’ 3WPNP male-to-male cable.

The 3W4PORT splitter/repeater may only be used with the RGBW system. The 6-port splitter is a two wire and can only be used with our standard DEKOR® Lighting system.