Blog
Blog
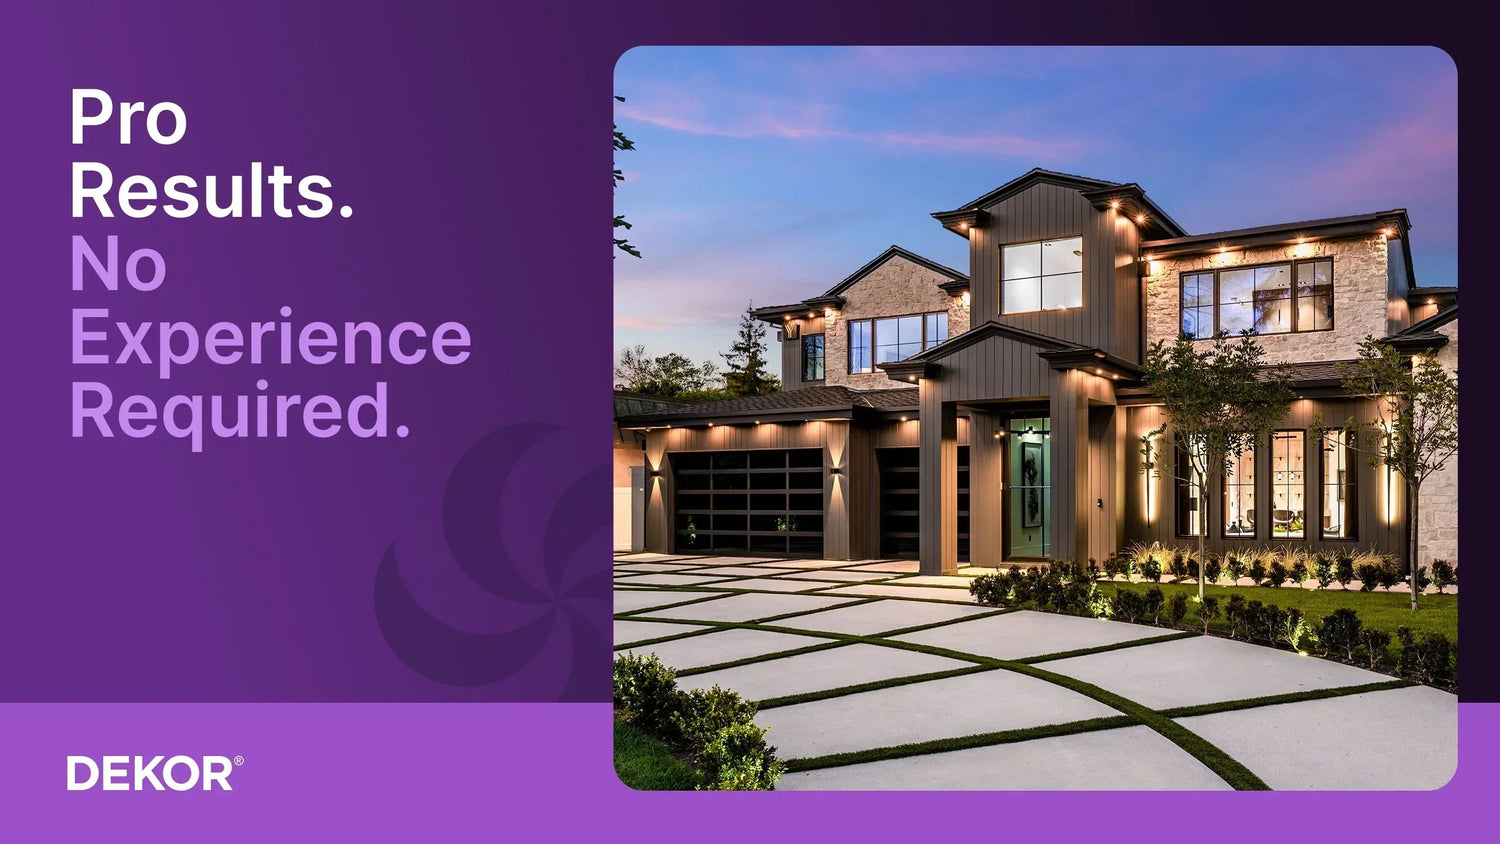
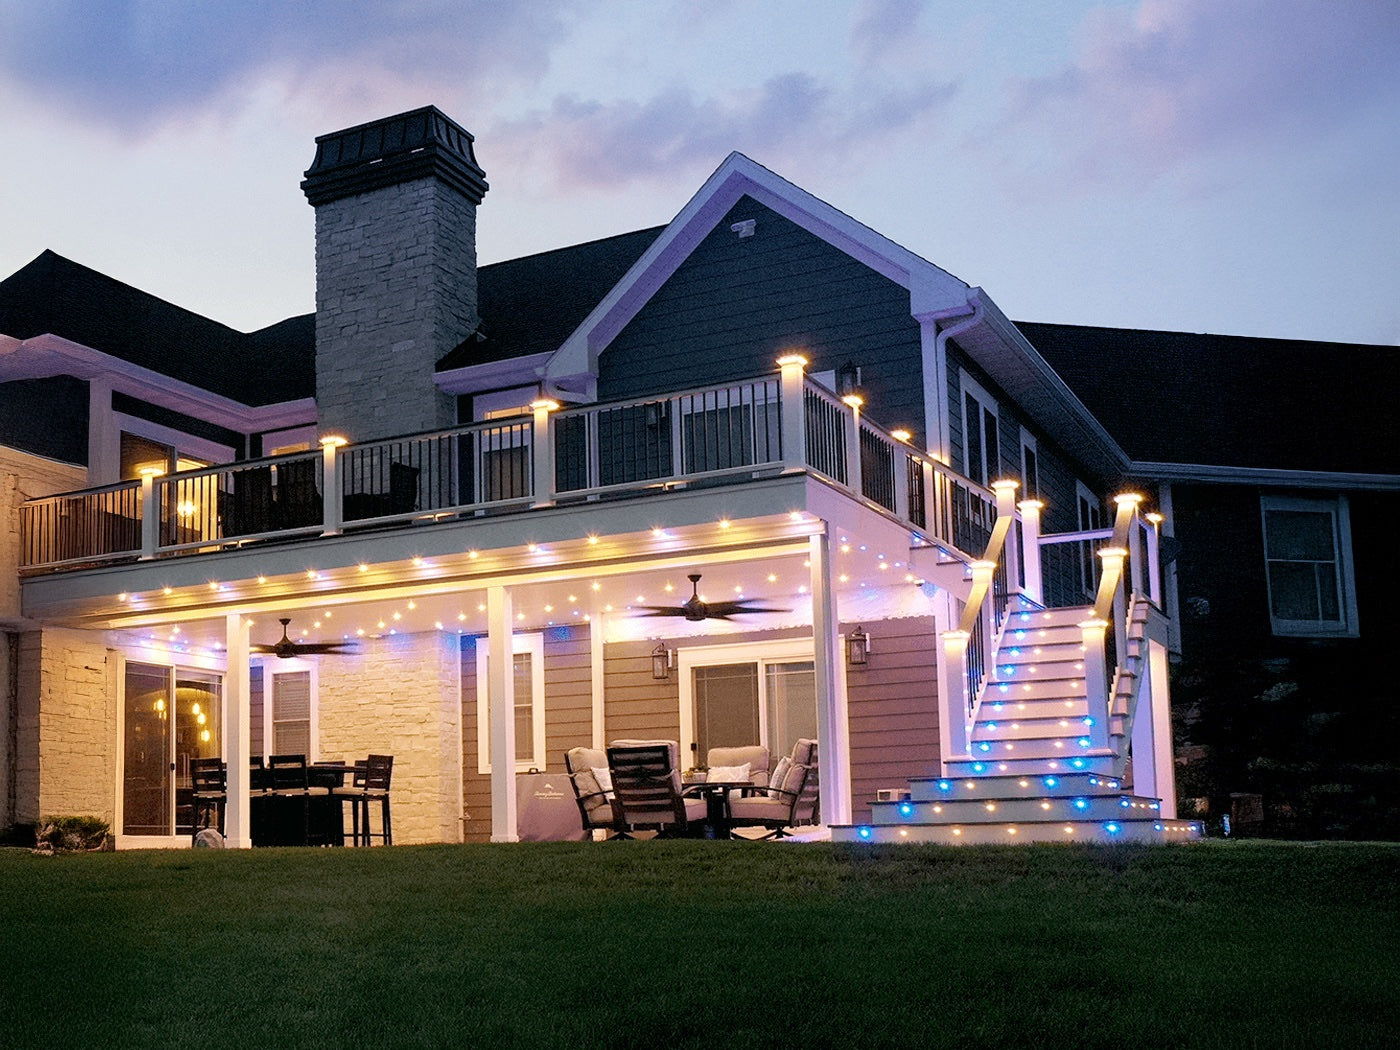
How to Install Landscape Lighting Like a Pro
Installing landscape lighting isn’t just about illuminating your yard — it’s about enhancing safety, curb appeal, and functionality that lasts long after the sun sets. With the right tools, planning, and product selection, even DIYers can achieve a professional-looking result. At DEKOR®, we design our lighting with easy installation in mind, offering everything from plug-n-play systems to expert support. Here’s how to install landscape lighting like a pro — and avoid the common pitfalls. Step 1: Plan Your Lighting Layout Thoughtfully A great installation starts with a smart plan. Walk your property at dusk to see how the space really behaves after dark. Key areas to illuminate: Entryways, walkways, stairs, and standout plants or structures. Power source location: Know where your transformer will be housed and how far cables will need to run. Visibility & balance: Avoid lighting everything equally — focus on layering for visual interest. Sketch your layout and consider lighting “zones” based on function: safety, ambiance, and accent. Step 2: Gather the Right Gear With a solid plan in place, it’s time to get your tools and materials ready. A smooth install starts with the right DEKOR components. Low-voltage transformer: Choose one with room for growth. Use our transformer calculator to determine the wattage needed. Connecting cables: Choose based on run length and fixture load. DEKOR cables make installation easy with plug-n-play connections. Landscape fixtures: Durable, low-voltage options like our LED path lights, puck lights, or uplights. Waterproof connectors, splitters, and mounting stakes. Pro Tip: Our LED Landscape Light Kits come pre-configured for easy installation. Step 3: Install Your Lighting with Precision Now it’s time to bring your vision to life — carefully and methodically. Take your time with placement to avoid having to redo work later. Lay out fixtures above ground first to visualize placement. Use a flat-edged shovel to create shallow trenches for cable runs. Connect each fixture using waterproof connectors, leaving extra slack for adjustments. Test everything before burying wires. Keep fixtures aligned with their intended light pattern and avoid placing them directly in line-of-sight to prevent glare. Step 4: Final Touches for a Successful Installation Bury wires 4–6 inches deep and secure fixtures. Set your transformer on a timer or dusk-to-dawn sensor. Revisit the space at night to confirm lighting angles and balance. Avoid These Common Landscape Lighting Mistakes Even seemingly simple lighting installs can run into trouble. Steer clear of these missteps to keep your landscape illuminated and your system running as it should: Over-lighting every feature (less is more!) Incorrect transformer sizing Exposed wiring or non-waterproof connections No plan for future expansion When to Hire a Pro If your property includes slopes, heavy hardscaping, or multiple power zones, it may be worth partnering with a DEKORPRO for added expertise. If that’s the case, please contact us for more information. We’ll be happy to help. Final Thoughts Landscape lighting should blend into your environment while adding warmth and usability. Whether you’re lighting a winding path or spotlighting trees, thoughtful installation makes all the difference. Explore our full line of LED landscape lighting and get started with DEKOR’s easy-to-install solutions. → Shop Landscape Lighting
Read more
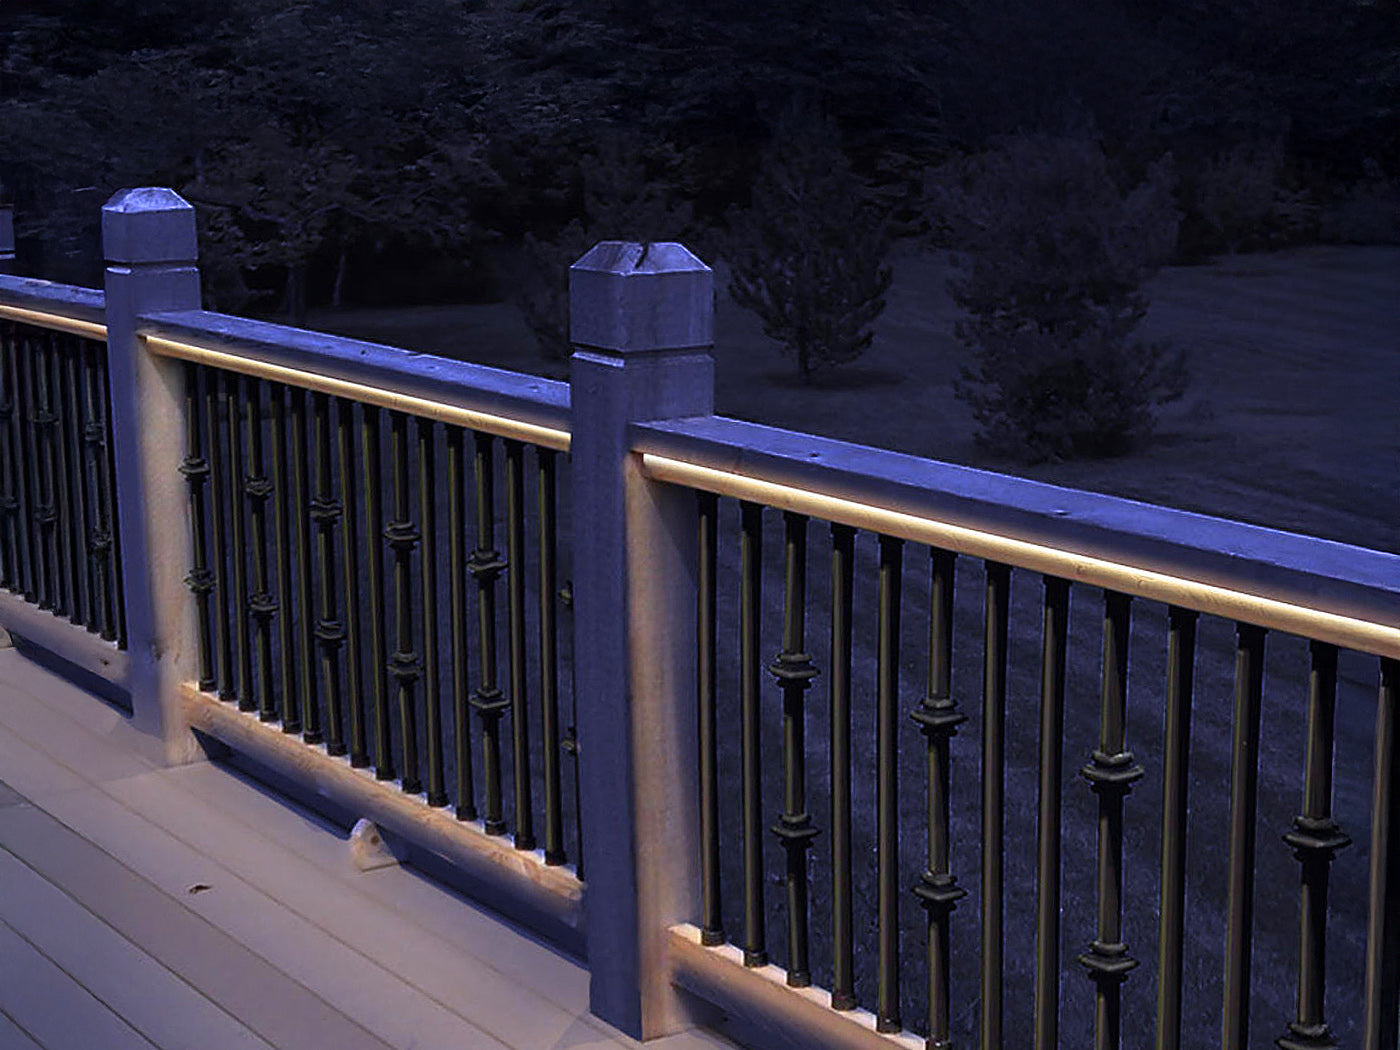
Elevate Your Deck and Patio Projects with DEKOR® RGBW
DEKOR® RGBW Color Changing System Welcome to the DEKOR® RGBW color-changing lighting system. Our dedicated team at DEKOR® invested over a year in crafting the ideal system, which boasts a remarkable 46% increase in brightness compared to competitors. Our system provides a comprehensive spectrum of colors, including vibrant options such as RED, GREEN, BLUE, PURPLE, WHITE, and many more. Notably, the white color is independently controlled, ensuring a pure and crisp illumination without the blending of colors as seen in other manufacturers’ products. Built into our connectors is a signal booster, seamlessly repeating the signal to maintain consistent brightness and true color accuracy from the first light to the last. This feature ensures that your entire project is uniformly illuminated. Elevate the ambiance of your deck or patio by effortlessly changing the light color theme to complement the season. With DEKOR®, experience nothing short of a vibrant and welcoming atmosphere. The DEKOR® RGBW cabling system not only ensures convenience but also adds a touch of brilliance and versatility to your outdoor spaces. FAQs Is your RGBW lighting system made in the USA? Yes, DEKOR® manufactures all circuitry in Denver, CO providing excellent quality. How do you dim the lights and change colors? DEKOR® offers a COLORKONNECT WiFi controller and through the app you can dim the lights, change colors, and set schedules. You may also control light colors with dimming capability manually on the front face of the COLORKONNECT WiFi device. Can you control the lights from anywhere in the world? When using the COLORKONNECT WiFi controller app provides you the ability to control your lights regardless of where you are located. What is the 3W4PORT splitter/repeater? The 3W4PORT splitter/repeater has two functionalities: the splitter is used to connect the power wire and the three additional ports for 2–3 lights based on your lighting plan. The repeater is to be used every 20’ with long cable runs and at the light connections to enhance the signal creating pure colors from the first light to the last. What type of connectors do you offer? DEKOR® offers a simple 3W4PORT Plug-N-Play system with various cable lengths to make the install easy in any application. How do I change the colors if I do not have my phone? You may change colors and dim the lights manually on the COLORKONNECT device. Can I have multiple zones to create colorful patterns? Yes, with the use of two or more COLORKONNECT WiFi controllers and wiring two or more zones will deliver different light color patterns. How many lights may I put on one zone? You may power up to 60-watts of light usage or 28 individual lights. Why should I buy DEKOR® RGBW system over the competition? Our lights are 46% brighter and we have a dedicated pure white channel. What cable lengths are available with your 3-wire Plug-N-Play system? We offer a variety of lengths for any application—20”, 5’, 10’ and 20’. If I already have the non-RGBW DEKOR® lighting system, can I add the RGBW DEKOR® lighting system? Yes, you can add to your current non-RGBW DEKOR® lighting system by adding RGBW lights! While the non-RGBW DEKOR lighting system is a 2-wire direct current system, and the RGBW DEKOR lighting system is a 3-wire direct current system, you are able to integrate both systems by creating a separate zone. Either using a splitter running from your current transformer or upgrading to a 100 or 200 watt transformer, which has more than one output from the transformer, you can create an additional zone or zones. Please call us if you need us to walk you through this! Does the transconnect cable work with your RGBW system? The transconnect cable is for our standard DEKOR® Lighting 2-wire lights. The COLORCONNECT WiFi controller is a 3-wire system. The male-to-male cables come in lengths of 20”, 5’, 10’, 20’ are to be used to connect the COLORCONNECT WiFi controller and then to your first light. Do you include the transconnect cable with every transformer? For our RGBW system: The 36-watt and the 60-watt transformers will include one (1) 20’ 3WPNP male-to-male cable. The 100-watt transformer will come with (1) transconnect cable and (1) 20’ 3WPNP male-to-male cable. The 200-watt transformer will include (1) 20’ transconnect cable with two lead wires and (1) 20’ 3WPNP male-to-male cable. Can I use the 6-port splitter at all in my design, along with repeaters? The 3W4PORT splitter/repeater may only be used with the RGBW system. The 6-port splitter is a two wire and can only be used with our standard DEKOR® Lighting system. Can I use the Y-Splitter with the RGBW system? No, you cannot use the Y-Splitter with the RGBW system. The Y-Splitter is for a 2-wire system. RGBW is a 3-wire system. If the transformer is a 100watt, you would need one COLORKONNECT for each leg. RGBW COLORDOT LEDs The DEKOR® RGBW cabling utilizes an advanced NexGen 3-wire system equipped with user-friendly Plug-N-Play connectors, an O-ring, and a locking collar designed to seal off even the harshest environments. Connecting them is a breeze, ensuring a hassle-free experience for users. We offer a range of cable lengths, including 20 inches, 5 feet, 10 feet, and 20 feet, providing flexibility for various scenarios. Additionally, our 4-port splitter allows you to connect multiple lights in a given area with ease. Electrical LED Type: Cree High Performance LEDs 50/50 Neopixle Light Output: White 29 Lumens, Colors 11 Lumens on average LED Colors: RGBW FULL COLOR SPECTRUM Watt Usage: 2.05W Voltage: 12VDC Controllable: Yes, compatible with DEKOR® COLORKONNECT WIFI Controller Safety and Warranty Waterproof: Weatherproof, not designed to be installed underwater. Approvals: ETL coming soon. Warranty: Please visit our website for the most up-to-date warranty information. Shop our RGBW collection
Read morePower-Saving Ideas for Landscape Lighting
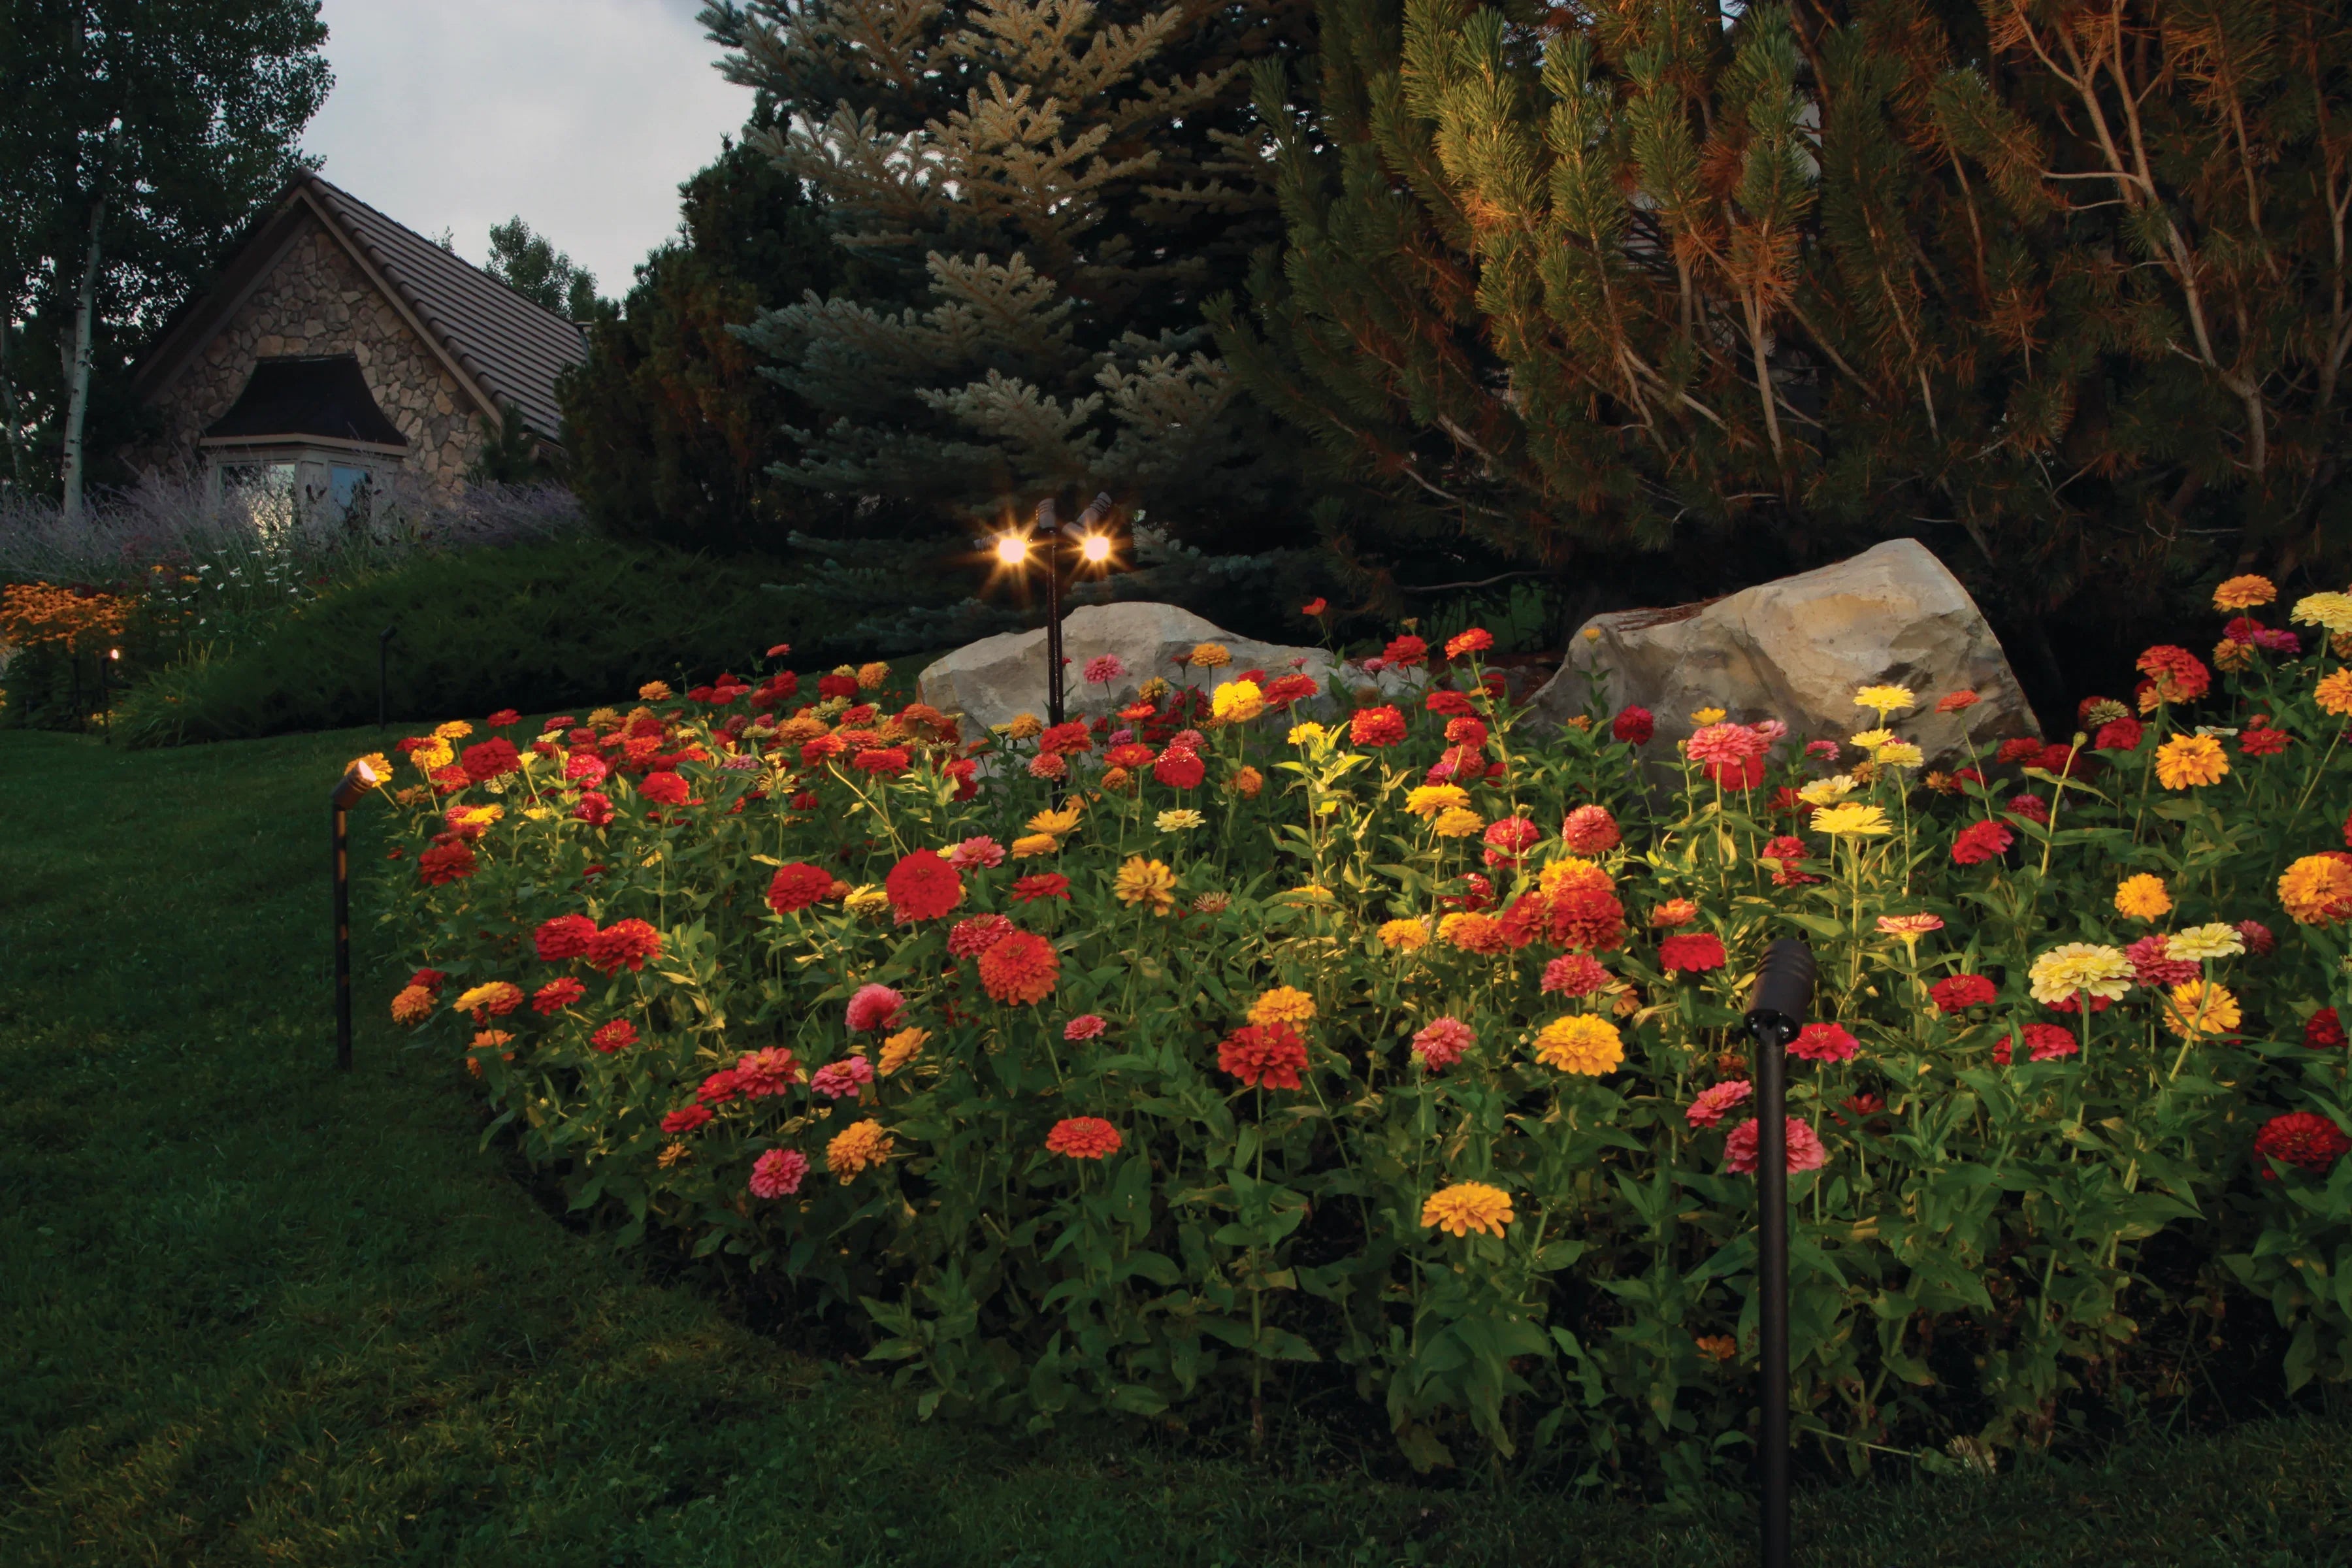
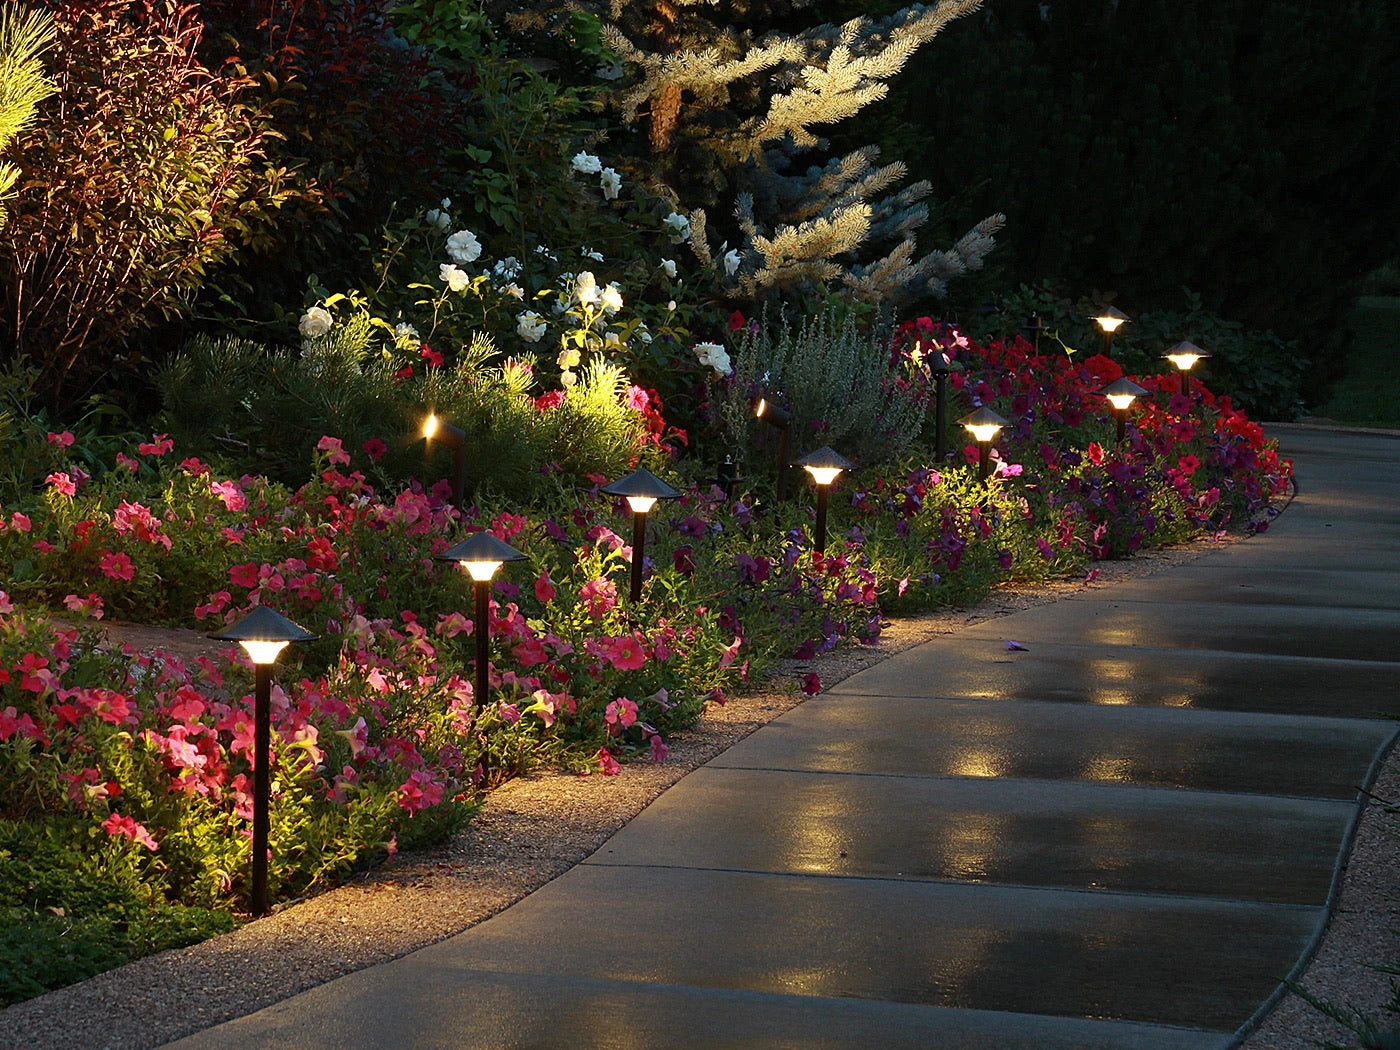
Your home may have beautiful interior décor, a well-maintained lawn, a flower bed plantation, and a backyard barbecue. However, it’s incomplete without proper landscaping and garden lighting. Outdoor landscape lighting adds charm, functionality, and safety to your home. When selecting landscape lights, you should choose energy-efficient options to save on your electricity bills. You can add energy-efficient lighting to your property in a variety of ways. Luckily, you can always find light fixtures suited to your landscape’s unique requirements that save on energy bills and help your family stay safe while having a fun time outside. Want to know the best power-saving ideas for landscape lighting? Read on! 1. Install Energy-Efficient Bulbs Nowadays, you have many more options than incandescent lights to illuminate your indoor and outdoor areas. The evolution of modern technologies has led to the emergence of LED bulbs, which are ten times more energy-efficient than the previously available options. They illuminate more extensive areas with an energy-saving bulb that casts a broader light. For both outdoor and indoor lighting requirements, LED, Compact Fluorescent (CFL) bulbs, and halogen lights are popular choices. LED lights consume much less energy but require unique installation because of different energy requirements. They need 12 volts rather than 120. CFLs are four times more effective than incandescent bulbs. As the light dims when the weather gets cold, you should protect the fixtures from such weather. Metal halide is another power-saving bulb that emits a natural-looking glow and is 3 to 4 times more effective than incandescent bulbs. Because the bulbs need warmth, they are inappropriate for any type of cold weather lighting in a yard. The energy-efficient bulbs have many benefits for the exterior landscape design, such as crisp lighting tint, cool bulbs, and long warranties. Pathway lights, such as the Empress LED Pathway Light, tiki-style torches, garden lights, such as the LED Landscape Spotlight, and outdoor lanterns, are some of the most popular choices for landscape lighting. 2. Choose Low Voltage Bulbs Low-voltage bulbs are ideal for landscape lighting because they conserve energy and lower energy bills. If you install incredibly bright lights, they may irritate your neighbors. The guests on your property may find it challenging to stay safe. The cars driving nearby your property also have accidents because of the flashy lights. Fifteen watts is usually enough for several landscape lighting implementations. 3. Invest in Motion Sensors Security is one of the key reasons behind landscape lighting. You can do that by installing motion sensors, since this helps save energy. They activate once they sense motion and stay on until the movement stops. Such lighting also helps in boosting security by alerting you and your neighbors as soon as someone is in your yard. Motion sensor lighting can be a great addition to the lighting framework surrounding your property’s driveway, gates, doors, and corners. You should position them a little higher so they can cover a larger area. 4. Maintain a Proper Light Height Think about how high you want to install your outdoor landscaping lights– the height dramatically impacts the light’s energy efficiency. The lamp distributes evenly if you install lights of different sizes in a yard. That way, you don’t need to install more lights to compensate for the dark areas in your yard. The perfect landscape lighting is about placing different lights at different height levels to illuminate every corner of your home exterior. 5. Set Timers On Never keep your lights on when lighting isn’t required, as this will unnecessarily increase your energy bills. When you use your landscape lighting only as needed, you’ll have more control over when lights shine and therefore, the amount of energy they use. Set timers on some, or all, of your landscape lights so you don’t need to stay home to switch them on or off. You can program a timer system to switch lights on when required, or use a daylight sensor, which monitors the sun’s rise and set. Using an intelligent hub to operate lights and save energy is even better. We highly recommend investing in the DEKORKONNECT™ WiFi Light Controller if you are looking to control your lights when you’re at home or away. With this fancy device, you can even set schedules for your lights, see the status of lighting zones, and change the brightness! 6. Add Solar Lights to the Landscape Do you live in a location that tends to stay sunny most of the time? You could opt for solar lights, which are an eco-friendly and power-saving option. Such lights will soak up all the light during the daytime, which will power them all night if installed in the sunniest parts of the yard. Solar lights may not be the perfect solution, depending on the outdoor lighting requirements. It may take many days to accumulate enough energy. The light emission can be dimmed more than electric lights. Outdoor solar lighting is usually free-standing and utilizes solar cells to energize lights separately. Solar stake lights are available in various styles, shapes, and sizes. They are widely used in garden beds and pathways. Some are designed more like lanterns or lamp posts, while others are mounted on fences and walls. Thus, you can install solar lights at any place you want. Once you select a solar light, check how long it functions during the night to confirm if it fulfills your requirements. Solar lights are a lucrative option for navigation or decorative lighting purposes. They can also add security to your property if installed correctly. 7. Planning Time To save the maximum amount of energy in landscape lighting, you must have a proper plan. When you have a well-laid-out plan, you can decide where to install low-energy lights, use elements like motion sensors, and position solar lights to get maximum sunlight. Draw your landscape and any other aspects to create a lighting plan. Work on those elements in your property that you want to enhance. Focus your energy on the house framework, external entertainment areas, pathways, trees, flower beds, and garden. Decide which kinds of lighting options work best with the individual aspects depending on decoration, size, and required amount of illumination. You should consider the overall impression given by the landscape lighting plan. If you’re really stuck, we’re here to help. We offer a free project planning service to help our customers reach their lighting landscape goals. Our Customer Care Team has years of both interior and exterior lighting design experience and will happily guide you on your next lighting project. Power-saving landscape lighting can always be a wise investment to boost your property’s visual appeal and security, yet also help save on energy bills. Dekor Lighting offers a diverse collection of lights for almost all types of landscapes.
Read moreHow to Size a Transformer for Landscape Projects | DEKOR Lighting
Lighting is an essential part of any landscape design. Not only does it make your space a little bit safer, but it can also help to create a welcoming atmosphere. In order to get reliable light output, you’ll need to choose the right size transformer. But how exactly do you size a transformer? Not only will we share the answer to that question, but we’ll also share some tips on where to find the best transformers on the market. What is a Transformer? For those who don’t know, a transformer is an electrical device that steps down the voltage from your home’s main line (usually 120 volts) to a lower voltage. This is important because landscape lights typically require 12 volts. Using a transformer to lower the voltage not only protects your lights, but also makes them more energy-efficient. 3 Steps to Sizing Your Landscape Lighting Transformer With a solid understanding of what a transformer is, let’s move on to how to size one for your landscape lighting needs. Consider the wattage of your lights Determine how much voltage you need Choose between magnetic and electronic We’ll go into more detail on each of these steps below. 1. Consider the Wattage of the Lights The first step is to determine how many watts your landscape lights will use. To do this, you’ll need to know the number of light bulbs and their wattage. Once you have that information, simply multiply the number of bulbs by the wattage. So, if you have 10 light bulbs that are each 15 watts, then your total minimum wattage would be 150 watts. If your total wattage is equal to the max transformer wattage capacity, we suggest stepping up to the next size transformer. 2. Determine How Much Voltage You Need Low voltage lighting is safe, efficient, and long lasting. Most landscape lights operate on just 12 volts of electricity while others may require up to 24 volts. To determine how many volts your specific lights need, check the packaging or manufacturer’s website. The required voltage should be clearly displayed. 3.Choose Between Magnetic and Electronic Having determined how many watts and volts your landscape lighting system will require, it’s time to select the right transformer type. The two main types of transformers are magnetic and electronic. Magnetic Transformers: These types of transformers are the most common and typically the most affordable. They’re also easy to install and are compatible with most landscape lighting systems. The downside is that they’re not as efficient as electronic transformers and they can be a bit bulky. Electronic Transformers: These transformers are more expensive than magnetic ones, but they’re also more efficient. They’re smaller in size, which makes them easier to conceal, and they have a longer lifespan. With all of the previous information, you’re ready to choose the right transformer for you. Calculating Your Transformer Size Doesn’t Have to Be Hard If you’re not a number person, sizing a transformer for your landscape lighting may seem like a daunting task. Luckily, there are calculators out there that can do the work for you. All you need to know is the number of light bulbs and their wattage. Once you have that information, simply plug it into a transformer calculator and it will do the rest. Dekor Lighting, a premier provider of high-quality landscape lighting, has a high-tech transformer calculator on their website. It shows all of the lighting models we offer along with the number of watts they produce. Just enter how many of each light you intend to hook up to the transformer. At the bottom of the calculator, you’ll see all of the transformer types available through DEKOR and a percentage denoting how much capacity your lighting project would take up for each transformer. There’s no easier way to size a transformer. Take a few minutes and play around with the number of lights and find the perfect transformer for your needs. Transformers are Not All Created Equal DEKOR transformers are specially manufactured to be super efficient and long-lasting. They have a wide range of features that make them ideal for any landscape lighting project, big or small. Some of the features that make DEKOR transformers stand out from the rest include: A wide range of wattage options Dual output leads for versatility IP66 waterproof rating. Multiple cord length options Easy installation Protection from short circuits, overheating, overloads, and more. Here’s a list of all of DEKOR’s Transformers. Feel free to take a look and compare them: EZ Indoor Power Driver 24W Capacity EZ LED Transformer 36W Capacity EZMAX Transformer 60W Capacity EZDIMMER8A Dimmable Transformer 100W Capacity EZMAXC Transformer 100W Capacity EZMAX200 Transformer 200W Capacity Now you know how to size a transformer for your landscape lights. With a little bit of planning and a nifty calculator, you can easily find the right transformer for your project.
Read more
A Guide to Waterproofing Your Lighting Project | DEKOR
How to Waterproof Your Lighting Project Waterproofing your lighting project is key to maintaining its longevity and avoiding costly repairs down the line. There are several waterproofing solutions available to you, and the best method will depend on the type of light fixtures you have and how they’re situated. In this article, we will tell you exactly how to waterproof your lighting project. What Needs to Be Waterproofed? The first step in waterproofing your lighting project is determining which part(s) of the project need to be protected from water. You’ll want to focus on the following: Any exposed wire connections The light fitting (the portion of the light that sits against the outer wall of your home). Your transformer and controller Depending on your lighting setup, you may need to address more than one of the items in the above list. 4 Ways to Waterproof Your Lighting Project When it comes to waterproofing outdoor lighting projects, you have several options. And choosing the right one can be the difference between your lights lasting for years or failing prematurely. We’ll go through the four main types of waterproofing solutions for lighting projects in this section: 1. EZ Enclosure Kit for Transformers With low-voltage lighting, you’ll typically need a transformer. And if you don’t keep it dry, your lights won’t stand a chance. To waterproof your transformer and controllers, you’ll need an EZ enclosure kit, which is a convenient polycarbonate storage box. It’s completely water-tight and will accommodate your transformers and controllers. To mount your enclosure kit, you’ll need to follow these instructions from the manufacturer, DEKOR. 2. Waterproof Cord Covers Cord safety covers are another solution you can use to waterproof your outdoor light fixtures. They are plastic covers that fit over any exposed wire connections and snap closed to protect them from the rain. How to Use Waterproof Cord Covers Waterproof cord covers are very straightforward to use. All you do is place two connected wires inside the safety cover. It’ll keep water out so you can enjoy your light fixtures without worry. You may need many of them to protect all of your fixtures. 3. Silicone Caulk Silicone caulk is a great option for outdoor light fittings that are attached to your home’s exterior. This type of sealant is easy to apply and can provide a high level of protection against water damage. Silicone sealant is available in clear and white versions – choose the one that best matches your project’s aesthetic. How to Waterproof Your Lighting Project with Silicone Sealant To waterproof your lighting project with silicone sealant, here are the steps you should take: Begin by using a damp towel to clean the exterior surface of the light fitting. Grab your caulk and cut off the end of the container to open it. Be sure to do so at a 45° angle. Start to apply the caulk around the light fixture on each side as well as the top. Avoid caulking the underside of the fixture. You need to leave a small area untreated so that moisture from inside the home can escape. Smooth the caulk around the fixture with a caulk smoothing tool or your wet finger, and then allow it to dry. Note: Silicone sealant can be difficult to remove if you ever need to move your light fixtures, and it is not recommended for use on metal surfaces. 4. Waterproofing Tape Tape is a foolproof way to waterproof your lights. But not just any tape – you need specialized waterproofing tape. While it’s not as durable as silicone, it’s easy to apply and remove. How to Waterproof Your Lighting Project with Tape To waterproof your lighting project with tape, simply apply a few layers of tape around the perimeter of each light fitting. Make sure that the edges of the tape are firmly adhered to both the fixture and the wall behind it, or water can and will get in. You can also wrap the tape around any wire connections that may be exposed to water. How to Choose the Right Waterproofing Solution Choosing the right waterproofing solution is essential if you want your lights to remain dry. Here are some tips to help you choose: If your light is attached to the exterior wall of your house without any outside connections, choose caulk or tape. If your light is in an area that’s susceptible to super heavy rain on a regular basis, you’ll need an extra durable waterproofing solution. Opt for either caulk or waterproof cord covers. If you suspect that you’ll be replacing or moving your lights anytime soon, stay away from silicone caulk. It’s notoriously difficult to remove cleanly. If you have a transformer, use the EZ Enclosure Kit. Tips and Tricks for Waterproofing Your Lighting Project To get the most out of your lights, it’s so important to get the waterproofing step right. Here are a few tips and tricks to help you do it right the first time: Always clean the surface of your light fittings before applying any waterproofing tape or caulk. This will help the solution to adhere better and provide a longer-lasting seal. If you’re using tape to waterproof your light fixtures, press the edges of the tape down firmly. This will prevent water from seeping in around the edges of the tape. Always allow the sealant or tape to dry completely before exposing it to the elements. Whether you choose to use tape, caulk, cord safety covers, or an EZ Enclosure kit, you can rest assured that your lights will be protected. We hope that you found this article helpful, and we wish you the best as you take your home’s lighting and safety up a notch.
Read moreWifi LED Controller: How to Control Your Lights With Wifi | DEKOR®
How to Control Your LED Lights With Wifi Imagine this: you just arrived at work in the morning, and you can’t remember whether or not you turned off the kitchen lights. Instead of letting the thought nag you all day, you check your phone to see which lights are on and which are off, all through an app. Or, you go on a two-week vacation abroad. You don’t want your house to sit looking dark and vacant for several weeks, so you go into your wifi controller app to strategically turn lights on for designated periods of time. This is the beauty of wifi LED controllers: simple, remote control of your lights. But, can it really be so easy? We think so. Or, at least, the DEKORKONNECT™ Wifi Light Controller is. We’ll walk you through how to set up your DEKORKONNECT™ Wifi Controller step-by-step. What Exactly Can a Wifi LED Controller Do? Before we get into the nitty-gritty of installation, let’s talk about the typical features of a wifi remote control. In the case of the DEKORKONNECT™ Wifi Light Controller, all of these features are accessed through the convenient Bond Home app, available on your mobile device. Adjust light brightness Create and set lighting zones Schedule lights Integrate with smart devices, like Google Home or Amazon Alexa, for access to voice control Access remotely To learn more about the features of the DEKORKONNECT™ Light Controller, visit this page. Connect Your LED Lights to a Wifi Controller Whether you’re adding a wifi controller to an existing lighting set-up or you’re installing a completely new lighting addition, it’s easy to set up the DEKORKONNECT™ wifi controller. All DEKOR® products are created with the average homeowner in mind, so they are perfect for DIY projects that do not require a professional. Getting Ready to Install Your Wifi Controller For best results for the DEKORKONNECT™ remote control, you’ll want to use DEKOR® products. Since this particular wifi controller is compatible with our Plug-N-Play system, it can be used with nearly every lighting product available from DEKOR®. The wifi controller can be used to control up to 60W of LED lights. If you wish to control more or add additional zones, you can always purchase more DEKORKONNECT™ controllers. You will still be able to manage them all through the same app on your mobile phone. To start, you will need the following supplies: A nearby outlet A 12VDC DEKOR® power supply or transformer DEKORKONNECT™ Wifi Light Controller Transconnect cable Splitters, if needed Any DEKOR® lights Your Android or iOS device Install the Hardware Install your DEKOR® lights as desired. Begin this process when you are ready to connect your lights to a power supply. Connect your cables with the power supply unplugged from the outlet. First, connect the input lead of the DEKORKONNECT™ to the DEKOR® 12VDC power supply. Connect the Transconnect cable to the installed DEKOR® lights as well as the DEKORKONNECT™ Wifi Controller. Plug your 12VDC DEKOR® power supply into a GFCI-protected outlet. If you see a red “FAULT” light, check the polarity key on your cable to make sure your Plug-N-Play connectors and splitters are properly attached before proceeding. You may wish to mount the Wifi Controller with included adhesive strips or by replacing the installed black screws with included wood screws. Note: If you attempt to connect more than 60W of lights up to the DEKORKONNECT™ Light Controller, the system will fault. In this case, unplug the power source, reduce the lights to less than 60W, and re-plug it in. Set-up the App and Connect Your Lights Download the Bond Home app on your mobile device. Create an account in the app. In the app, tap the blue “+” to add a new device. The app should recognize your DEKORKONNECT™ Wifi Controller as a “Smart by Bond” device. It will appear along with its unique ID. Follow the steps in the app to configure your device and connect it to your wifi network. Here is a handy video tutorial in case you need some visual guidance: Now, you have all of the tools you need to hook your lights up to a top-of-the-line, smart LED controller. From here, you can take advantage of all of the features that the DEKORKONNECT™ Wifi Controller has to offer.
Read moreHow to Install Dimmers: On a Light Switch or With a Remote Control
Light dimmers are incredibly useful in both indoor and outdoor contexts. Inside, dimmer switches allow you to adjust lighting depending on how bright the natural light is in a room at any given moment. Outside, waterproof dimmers with remote controls are perfect for setting the mood for any outdoor living space. There are two primary types of dimmers we’ll explore in this article: dimmers with remote controls and dimmer switches. Dimmers with remote controls are particularly convenient outside because you can control them from a distance, although they can be used in indoor applications as well. Dimmer switches look like traditional light switches but include dimming functionality, which allows you to adjust your light brightness simply by pressing on the switch. Despite what you might think, it’s not difficult to install dimmers and switches, especially the ones offered by DEKOR®. In the following sections, we’ll walk through exactly how to install the two types of dimmers mentioned above. How to Install Dimmers on a Light Switch If you want dimmable indoor lighting, installing dimmer switches is the best and easiest way to get it. DEKOR®’s EZ Wireless Dimmer Switch is a convenient wireless wall switch, available as a kit with a receiver included or just the switch. And yes, you read that right: this dimmer switch is wireless. No complicated wiring set-ups here: just screw the switch to an existing junction box or nearly any wall surface. You’ll need the receiver to operate the switch; it connects to a transformer with a cable, then plugs into an outlet. The receiver is teachable, so you can control your dimming settings. Install Your Light Switch Follow these steps to install and wall mount the light switch. Link the light switch to the receiver before mounting it on the wall. Make sure the light switch is within 16 feet of the receiver when linking. Press the rocker of the light switch while the receiver is in link mode. Then activate by pressing the rocker again after the receiver has been connected and is no longer in link mode. Choose your installation method: screw surface mount, adhesive surface mount, or switch box mount. Screw surface mount: If necessary, drill pilot holes into the wall. Attach the backplate to the wall with suitable screws (not included). Add the switch to the back plate with included 6 x 3/8″ screws. Then attach the faceplate with included screws. Adhesive surface mount: Add the switch to the back plate with included 6×3/8″ screws. Attach the faceplate with included screws. Apply adhesive tape to the back plate of the switch and affix it to the wall. Switch box mount: You will not need the back plate for this installation. Attach the switch into the screw holes on the switch box using the included 6-32 x 3/4″ screws. Then attach the faceplate with included faceplate screws. Teach the Receiver There are two parts to the installation process for dimmer switches because your dimmer won’t work without a properly installed receiver. The receiver allows you to teach your dimmer switch your preferred settings. Follow these steps to install the receiver. Make sure the receiver is linked to your light switch (see step 1 for “Install Your Light Switch”). Determine how you want to program your receiver. There are 4 different learn modes, which will help determine what kind of movement will turn your lights on and off (press and release vs. press and hold) and will also set the dimming functionality. Find out more about the learn modes in our full installation guide here. Once you determine your desired learn mode, press “LRN” on your receiver with a pen for 0.5 seconds, then release. This will put you in Learn Mode 1. If you wish to enter a different learn mode, press the “LRN” button again and hold for 3 seconds. This should put you in Learn Mode 2. Repeat this step if you wish to enter other learn modes. From here, you can “teach” the transmitter by pressing the switch according to the instructions for your designated learn mode. The light bulb should blink according to the pattern outlined in the installation guide (linked above). To exit configuration mode, simply wait 30 seconds. If you wish to clear your configuration, press the “CLR” button with a pen for several seconds until the light begins to blink. How to Install Remote Control Dimmers (Alt text: DEKOR® EZ Waterproof Low Voltage / LED Dimmer with Teachable Remote) If you’re looking for an easy-to-install dimmer that doesn’t require a light switch, the EZ Waterproof Dimmer with a Teachable Remote is ideal for outdoor use. DEKOR® also offers a dimmer with a remote designed specifically for indoor use. Installing remote control dimmers is often just a matter of connecting the dimmer to your lights and a power supply. Let’s walk through the instructions for installing the EZ Waterproof Dimmer, including how to program the teachable remote. This is assuming you already have your DEKOR® lights selected and ready to plug into the power supply. Attach the male end of the cable to the output of the DEKOR® transformer. Attach the female end to the transconnect cable included with the transformer. Connect the transformer to a 120V AC outlet protected by a GFI circuit. To teach the remote: Unplug the transformer from the wall outlet. Press and hold the up and down arrow buttons on the remote at the same time. Plug the transformer into the wall outlet (you should see the connected lights flash). Release the up and down arrow buttons on the remote. Press the power button on the remote. Test all functions. Find Your Next Dimmer With DEKOR® It’s never been easier to install dimmable and adjustable lighting. All of the dimmers mentioned in this article can be installed in minutes by anyone: no need for a lighting professional to come into your home. For DEKOR®’s full selection of dimmers, switches, timers, and other accessories, see our offerings here. And if you’re looking for a way to control the lights in your house remotely, our DEKORKONNECT™ WiFi Light Controller is the perfect solution. Create zones, set schedules, and dim your lights all from the Bond Home app on your phone.
Read morePlug-N-Play™ Technology: Our DIY-Friendly, Waterproof Connector System
If you can charge your cell phone, you can install our products. Duane McCall President and CEO of DEKOR® DEKOR® now designs the majority of our products Plug-N-Play™. We listened to the feedback from our customers, and simple, user-friendly installation was top of the list. Our Plug-N-Play™ Connector System is completely self-sealing, removing the need for stripping wires and wire nuts. Plug-N-Play™ takes the guess-work out of installation; no need to track the polarity (red and black wires) because DEKOR connectors are keyed to plug in the correct way. With the introduction of the new EZ Plug-N-Play™ Splitter, you can now junction up to 4 lights into one device streamlining the whole installation process. Do you DIY? If so, you’ll love the ease of installation. If you’re a professional, you will love how Plug-N-Play™drastically cuts installation time and cost. Advantages of the DEKOR® Plug-N-Play™ Connector System: Waterproof, IP 67 minimum Easy, tool-free connection No cutting, stripping wires, wire nuts All connectors are pre-assembled and individually tested Simply “plug male into female connectors” Self-sealing connectors fit perfectly Keyed connectors –polarity is determined by the connector Can be connected or disconnected while under load Low voltage safety ETL Certified.
Read more