Blog
Blog

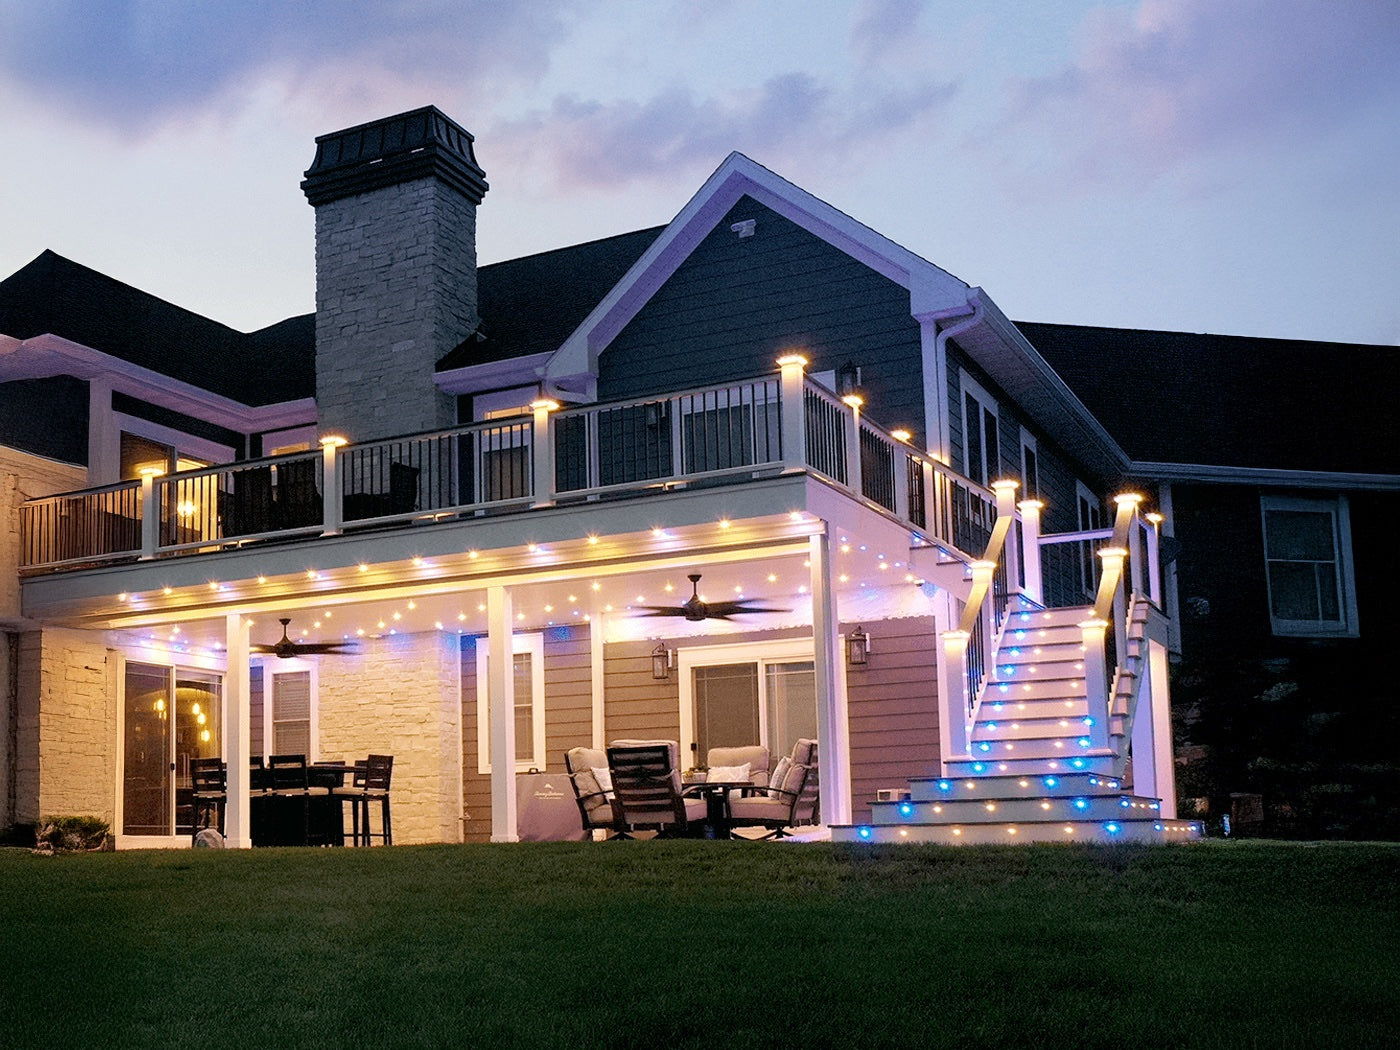
L'Accents by DEKOR® Press Release
FOR IMMEDIATE RELEASE Introducing L’Accents by DEKOR® Lighting: Elevating Outdoor Spaces with Timeless Elegance DEKOR® Lighting – DEKOR® Lighting proudly unveils our latest innovation in LED outdoor lighting: L’Accents. Merging sophistication with functionality, L’Accents is designed to redefine outdoor ambiance, offering integration of lighting into every step of the construction process. Setting itself apart from conventional alternatives, L’Accents is also exclusively crafted by DEKOR®, ensuring unparalleled quality and design. While it’s designed for construction integration, it can also be effortlessly added to existing outdoor settings. During the day, L’Accents adds subtle sophistication to outdoor spaces with its intricate patterns; at night, its gentle glow transforms the landscape by highlighting architectural features. With the option of a decorative riser light, rail light, or inlay tile that comes in three unique patterns, two color options and two colors temperatures, this innovative approach ensures a harmonious design aesthetic from the ground up. At the heart of L’Accents lies a commitment to elegance and sophistication. With its sleek design and versatile lighting options, L’Accents transforms outdoor environments into captivating retreats, where every detail exudes timeless allure. Key features of L’Accents include: LED Technology: L’Accents features advanced LED technology, providing energy-efficient illumination that enhances outdoor spaces with long-lasting brilliance. Seamless Integration: This versatile lighting solution easily integrates into any outdoor space, whether installed during construction or added to existing settings. Versatile Lighting Options: From stair risers to accent lighting, L’Accents offers a variety of lighting options to suit every outdoor space, allowing for customizable illumination tailored to individual preferences. L’Accents also comes in two different temperatures: DEKOR’s® standard, 3200K, or 6000K. Durable Construction: Crafted from high-quality materials, L’Accents is built to withstand the elements, ensuring long-lasting performance and durability, and comes with a lifetime warranty. Effortless Installation: With its user-friendly design, L’Accents simplifies the installation process, allowing for hassle-free integration into construction projects. As part of our launch, DEKOR® Lighting invites customers to discover the beauty and versatility of L’Accents and experience outdoor lighting in a whole new light. To learn more about L’Accents and explore DEKOR® Lighting’s full range of products, visit our website. About DEKOR® Lighting: DEKOR® Lighting is a leading provider of innovative lighting solutions for indoor and outdoor spaces. With a passion for design and innovation, DEKOR® Lighting is committed to creating lighting products that enhance the beauty and functionality of any environment. For media inquiries, please contact: Sophia Powers sophie@dekorlighting.com 303.991.2285
Read more
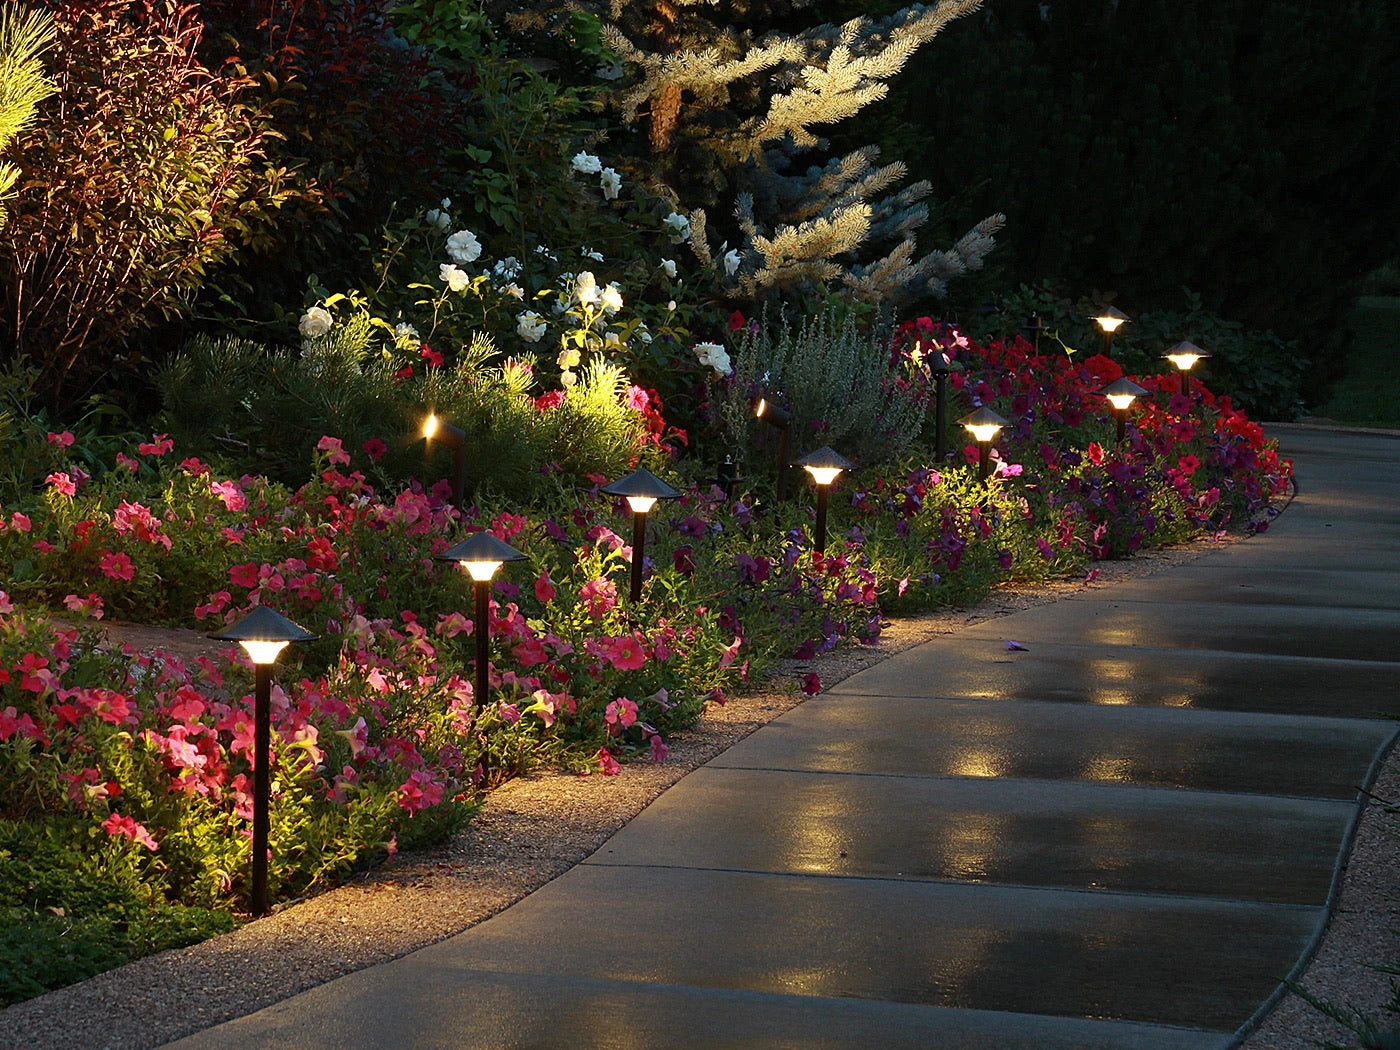
April Showers, Lighting Flowers: Lighting Collections for Rainy Days to Starry Nights
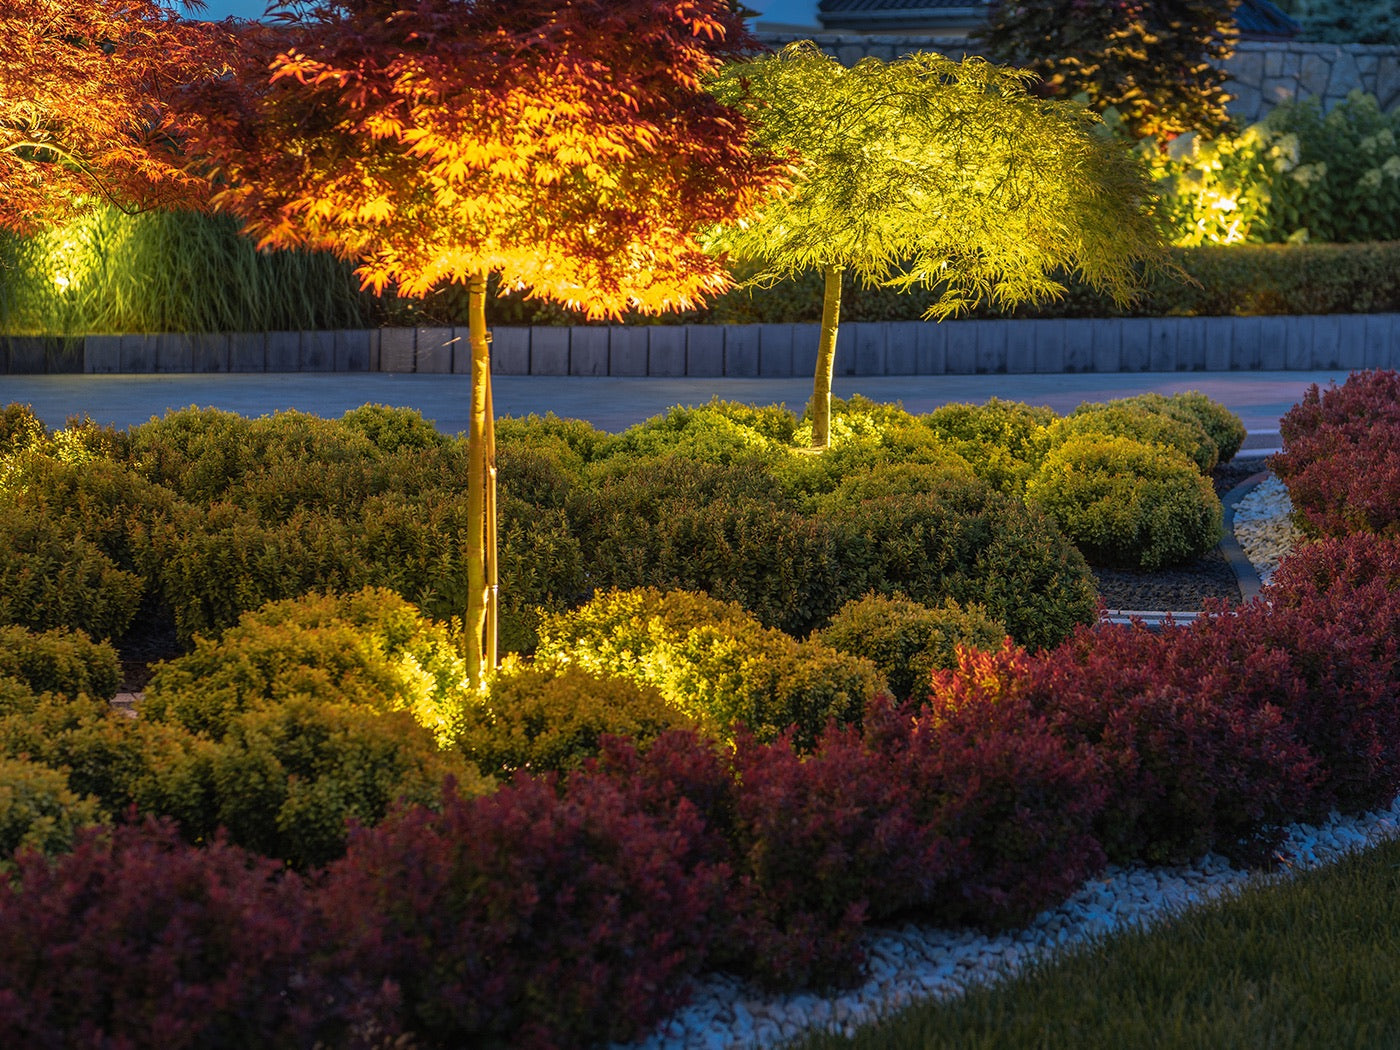
Spring heralds a season of vibrant colors and renewed energy. At DEKOR® Lighting, we embrace this change with lighting solutions that not only illuminate but also enhance the natural beauty of your home and garden. Our products blend seamlessly with the springtime ambiance, creating spaces that are both functional and aesthetically pleasing. Deck Lighting with Flat Post Caps with LED Lights The Flat Post Caps are a perfect blend of elegance and functionality for your deck. These post caps not only add a sophisticated touch to your outdoor space but also provide essential lighting for safety and ambiance. Designed to fit seamlessly on top of your deck posts, they cast a soft, downward light that highlights the deck’s architecture while ensuring safe navigation at night. As the weather starts to warm, your deck gatherings will be transformed with the warm glow from the Post Caps. They create an inviting atmosphere for evening get-togethers, extending the hours you can enjoy your outdoor space. Their durable construction and energy-efficient LED technology make them a smart and stylish choice for any deck. Garden Glow with Tree Gang 3 Fixture Landscape Spotlight Our Tree Gang Spotlight is specifically designed to showcase the beauty of your spring garden or backyard landscape. These lights can be strategically placed to highlight everything from a colorful Maple to a blossoming fruit tree, bringing them to life after dark with a warm, welcoming glow. Installing these spotlights not only enhances the visual appeal of your garden but also adds a layer of security. They illuminate pathways and dark corners, reducing the likelihood of accidents, and deterring potential intruders. Their weather-resistant design ensures they remain a stunning garden feature throughout the seasons. Pathway Perfection with LED Rope Lights Nowadays, pathway lighting is an absolute must when it comes to completing the atmosphere of outdoor spaces. Our DEKOR® Flex LED Rope Light is the ideal solution for subtle yet effective pathway illumination. These simple yet versatile lights pack a powerful punch, providing enough brightness to light up walkways while maintaining a low profile in your garden’s design. Their flexible nature enables them to be the perfect lighting solutions for a curve, bend or angle in your pathway or railing. These rope lights come in 5’ measurements, however they can be customized to fit your backyard or outdoor space! Simply let us know the dimensions you need, and we can create the perfect fit for your project. *It’s important to note that we do not recommend cutting the rope lights yourself Eco-Friendly Enchantment with Recessed LED Downlights At DEKOR®, our LED Recessed Down Lights are designed to enhance your outdoor living spaces with elegance and efficiency. These lights are perfect for creating a cozy ambiance in gardens and backyards, seamlessly integrating into deck ceilings or porch overhangs for a sophisticated look. The best part? LED lights are highly efficient, consuming significantly less electricity than traditional bulbs, which can lead to lower energy bills. They also have a longer lifespan, reducing the need for frequent replacements and emit less heat– enhancing safety and comfort in indoor and outdoor spaces. Their compact size allows for versatile design options, making them ideal for whatever your lighting needs may be. DEKOR®'s Well Pathway Light for Enchanting Spring Evenings Embracing both functionality and style, our Well Pathway Light offers a warm, inviting glow, perfect for lighting up the blooming beauty of your garden during the spring season. Its robust, waterproof design guarantees that the light remains a beacon of warmth and welcome, regardless of the weather. With this pathway light, you can create a mesmerizing outdoor atmosphere that not only highlights the fruits of your gardening efforts but also ensures safe passage along paths and walkways after dusk. This product is designed not just to withstand the seasonal April showers but to thrive in them, ensuring your garden’s walkways, flower arrangements, and architectural features are beautifully showcased. The durable construction and easy-to-install spike system make it a standout choice for homeowners looking to enhance their outdoor spaces with reliable, aesthetically pleasing lighting. DEKOR® Maintenance Tips It wouldn’t be springtime without a few rainy spurts here and there. While the rain is great for our outdoor havens, it’s pertinent to ensure your outdoor lighting system remains in top condition through the rainy season and beyond. Begin by conducting thorough inspections of all lighting fixtures, looking for any signs of water ingress, corrosion, or damage—these issues can compromise the functionality and safety of your lights. Cleaning the fixtures to remove dirt, leaves, and water spots not only enhances light output but also prevents overheating. It’s equally important to check and tighten any loose connections and ensure that the electrical components are well-protected against moisture. Applying a silicone sealant to gaskets can offer an extra layer of waterproofing. For systems with buried cables, verify that the insulation is intact to prevent water-induced electrical faults. Following these steps will not only prolong the life of your outdoor lighting but also ensure that your garden remains beautifully and safely lit, no matter the weather. Conclusion Spring is a time for renewal, and what better way to celebrate than by refreshing your home and garden with beautiful lighting. DEKOR® Lighting offers solutions that are not only aesthetically pleasing but also environmentally friendly and energy-efficient. Embrace this season of growth with lighting that transforms and enriches your living spaces, both indoors and out.
Read more
Spring Awakening: Illuminate Your Home and Garden for a Fresh Start
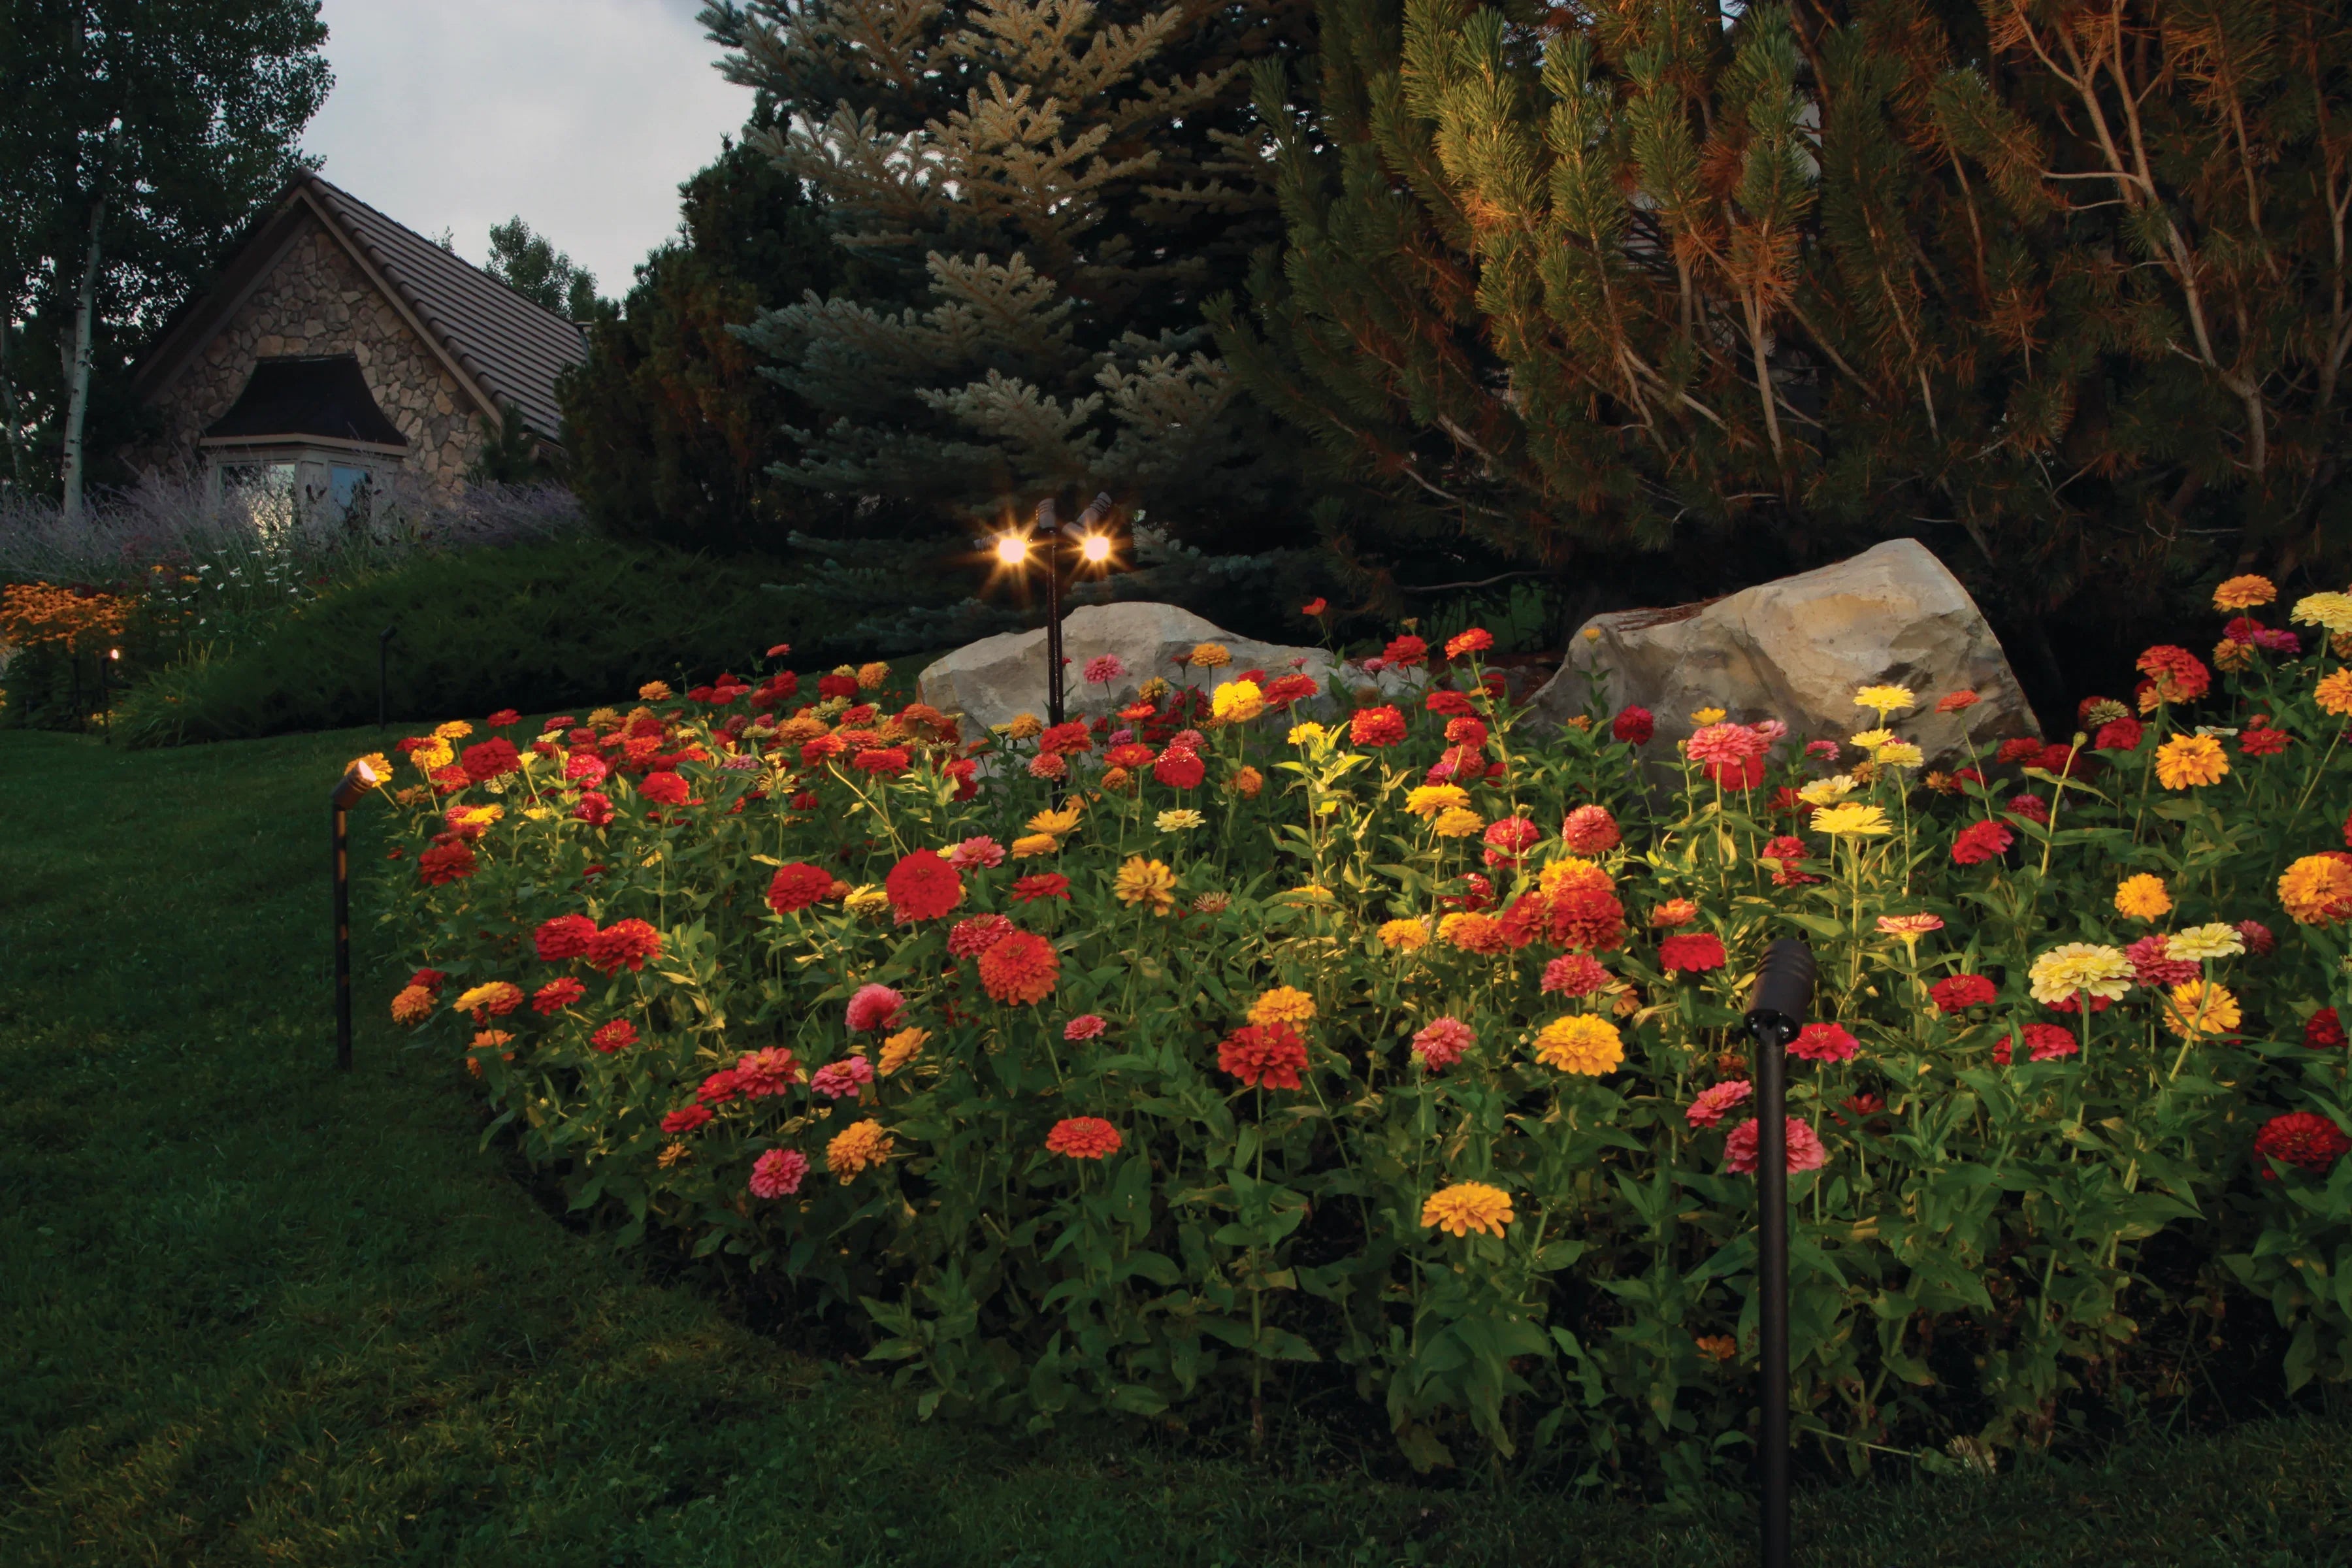
As the vibrant season of spring ushers in, it’s the perfect time to infuse your home and garden with radiant illumination. As you delve into the world of garden lighting, you can emphasize the elements you are most proud of with thoughtful solutions creating secure and enchanting outdoor spaces. Embracing the Glow of Garden Lighting Garden lighting extends far beyond practicality; it revolves around creating an inviting ambiance. Crafting this atmosphere requires thoughtful planning and the careful selection of lighting fixtures that contribute to an aesthetically pleasing and welcoming outdoor space. Installation should adhere to safety standards, and the choice of fixtures must account for environmental factors such as weather. Take, for example, the Puck Colored LED Landscape Light, crafted to withstand diverse weather conditions. These lights epitomize the perfect harmony of durability, safety, and aesthetic appeal, making them an excellent choice for gardens, patios, and outdoor spaces. Their enduring design ensures your garden remains glowing throughout the year. The Brilliance of Garden Pathway Lighting In outdoor spaces such as gardens, efficient lighting not only elevates visual appeal but also plays a significant role in setting the ambiance. Gleaming garden pathways, corners, and focal points not only contribute to the overall aesthetics but also enhance the overall experience, minimizing the chance of mishaps and creating an engaging atmosphere. DEKOR®’s Pathway Lighting is designed to gracefully light up your garden, providing a perfect blend of functionality and style. With durability to withstand outdoor elements, these lights contribute to the overall safety and beauty of your garden, ensuring a seamless transition from day to night. Elevating Security in Outdoor Spaces Well-lit gardens not only enhance the visual appeal but also deter unwanted activities. Poorly lit areas are more susceptible to security threats. Thoughtful lighting placement can illuminate dark corners and hidden spots, making it challenging for intruders to go unnoticed. This not only safeguards your property but also imparts a sense of security to those who enjoy your garden. To ensure a secure garden lighting setup: 1. Choose Durable Fixtures Opt for lighting fixtures designed to withstand outdoor conditions. 2. Incorporate Motion Sensors Enhance security while conserving energy by installing motion sensors. 3. Achieve Uniform Luminescence Strategically place lights at regular intervals to eliminate dark spots and ensure a uniformly lit garden. The Radiance of Hardscape and Masonry Lighting Lighting for hardscapes and masonry requires a strategic approach to enhance safety and aesthetics. Proper brightness is essential to navigate walkways and steps while preserving the integrity of the design. DEKOR®’s Masonry Paverstone Lighting is a testament to safety-oriented design. Engineered to seamlessly integrate with their surroundings, these lights offer effective luminosity while maintaining a low profile. The strategic placement of each light ensures that your entire outdoor area is safely navigable, minimizing the risk of accidents. Selecting Fixtures for Hardscape Brilliance Choosing the right fixtures is crucial for hardscape and masonry lighting. Opt for durable and weather-resistant lighting solutions that can withstand outdoor elements. Low-profile designs seamlessly blend into the surroundings, reducing the risk of tripping. LED fixtures, with their energy efficiency and low heat emission, are an ideal choice for areas where people walk. Modern Advancements for Enhanced Safety Modern lighting solutions come equipped with advanced features that significantly contribute to safety. Automated lighting systems, motion sensors, and energy-efficient LED technology are integral components of DEKOR® Lighting products, making them a top choice for safe and contemporary outdoor lighting. Green Brilliance: Environmental Considerations Environmental responsibility is a cornerstone of lighting safety. Eco-friendly lighting solutions not only reduce environmental impact but also ensure safety and visibility. Solar-powered lights, such as our Savona Solar Post Cap lights, offer a sustainable option without compromising on light quality. Opting for lights with a longer lifespan reduces waste and the need for frequent replacements. DEKOR® Lighting’s commitment to environmental sustainability is evident in our product range, providing solutions that are both safe for users and the environment. In the spirit of a new season, let the sparkle of garden lighting from DEKOR® brighten your outdoor haven. As you navigate the transformative journey of spring, our commitment to safety, functionality, and style ensures that your home and garden are not merely well-lit but become radiant sanctuaries. With products designed to withstand the elements and contribute to both security and aesthetics, DEKOR® Lighting invites you to embrace the blooming brilliance of a fresh start. Step into the luminous embrace of our lighting solutions, and let your outdoor spaces come alive with the vibrant energy of spring, fostering a haven that is safe, secure, and visually captivating. Illuminate your world and watch it blossom with the promise of new beginnings.
Read moreIlluminate Your Love Story: A Guide to Valentine's Day Lighting Decor
Valentine’s Day is a celebration of love and affection, a time to create memories with that special someone. The ambiance you create plays a huge role in making the day unforgettable, and lighting is at the heart of this. DEKOR Lighting, with its array of innovative lighting solutions, offers the perfect tools to craft a romantic setting. Let’s explore how you can use lighting to transform your space into a love-filled haven this Valentine’s Day. The Essence of Romantic LED Lighting Romantic LED lighting is all about setting the right mood. It’s the soft glow that surrounds a beautiful dinner table or the twinkling lights that mimic stars above. The key is to achieve a soft, warm, and inviting atmosphere, usually with dimmed lights that enhance intimacy and comfort. This can be achieved through a combination of ambient and accent lighting, which together create a layered and rich lighting effect. Ambient Lighting Ambient lighting, often referred to as general lighting, is the primary source of light in any space, whether it be for indoor lighting or outdoor lighting. Its main role is to provide a comfortable level of brightness, allowing for safe and easy navigation throughout the area. Ambient lighting is typically uniform and diffused, minimizing harsh shadows and creating an inviting atmosphere. In homes, fixtures like ceiling lights, wall-mounted fixtures, or large lamps commonly serve as sources of ambient lighting. In outdoor settings, ambient lighting can be achieved through overhead lights, post lights, or wall lights that illuminate larger areas evenly. Our Recessed LED Down Lights are a quintessential choice for achieving this harmonious balance. These lights provide a uniform, diffused glow that minimizes harsh shadows, creating an inviting and safe atmosphere. Accent Lighting Accent lighting, like the Glow-Rite LED Hardscape Wall Light, is more focused and is used to highlight specific objects, architectural features, or areas within a space. This type of accent lighting adds depth and dimension to the environment, drawing attention to particular points of interest like artwork, architectural details, or landscaping elements. It is often more intense than ambient lighting but used in smaller quantities. Examples include track lighting, spotlights, or landscape lighting that specifically illuminates trees, sculptures, or water features. Accent lighting is key in creating a dynamic and visually interesting space, enhancing the aesthetic appeal of the area. Transforming Spaces with Deck Lights Deck lights are versatile and can be incredibly romantic, especially for an outdoor Valentine’s setting. Imagine a deck draped in warm, soft lights, creating an intimate outdoor dining area or a cozy nook for two. These lights can outline the space, accentuate its features, and provide a warm, welcoming glow. When choosing deck lights for Valentine’s Day, consider their placement to maximize their romantic potential – around seating areas, along railings, or even integrated into steps to lead the way to a surprise setting. DEKOR’s range includes lighting options that can suit any deck style, adding both charm and safety to your romantic evening. Dock and Marina Lights: A Unique Valentine's Ambiance For those lucky enough to be near water, the use of dock and marina lights can create an enchanting setting. The way light plays off the water adds a magical, almost surreal quality to the evening. DEKOR’s Flat Post Cap with LED Top Light are not just robust and weather-resistant, but they also provide a soft illumination that’s perfect for a night of romance. Picture a dockside dinner with the gentle glow of lights reflecting off the water, creating a dance of light and shadow that adds to the romantic ambiance. Hardscape and Masonry Lighting for Romantic Pathways A beautifully lit pathway sets the tone for a romantic evening. Using DEKOR’s LED Paver Dot™ Lights, you can create a path of light that leads to a special place, like a garden gazebo or a hidden bench. This type of lighting is not just functional; it’s also incredibly atmospheric. It can transform a simple walk into a memorable journey, enhancing the anticipation and excitement of the evening. The soft glow of these lights can guide you through a beautifully landscaped garden or along a stone path, making every step towards your Valentine’s surprise part of the romance. Soft Illumination for a Cozy Indoor Setting Valentine’s Day celebrations are not limited to outdoor spaces. The right indoor lighting can turn any room into a cozy, romantic retreat. With DEKOR’s indoor lighting solutions, you can create an ambiance that’s both warm and inviting. Consider strip lights to adjust the atmosphere throughout the evening and create an intimate glow in your space. Place lights to accentuate romantic elements like a beautifully set table, a bouquet of roses, or a collection of photographs that tell the story of your love. This Valentine’s Day, let lighting be the language of your love. With DEKOR Lighting’s diverse range of options, you can create a setting that is not just visually stunning but also resonates with the spirit of love and togetherness. Illuminate your love story with lights that inspire romance and intimacy, making this Valentine’s Day an unforgettable experience.
Read more
RGBW Color-Changing Lighting System Press Release
FOR IMMEDIATE RELEASE: DEKOR Unveils New Product Feature: RGBW Color-Changing Lighting System DEKOR LIGHTINGDenver, CO – 01/08/2024 – As we continue to revolutionize the lighting industry, DEKOR is proud to announce our newest feature – the RGBW (Red/Green/Blue/White) color-changing lighting system. This groundbreaking system marks a significant advancement in the field, outperforming competitors by offering a 46% increase in brightness. Our dedicated team spent over a year perfecting this technology. The DEKOR RGBW system uniquely provides an independent, pure white light, achieving a level of crisp illumination unseen in other products. Our system guarantees consistent brightness and true color accuracy from the first light to the last. The versatility of our system allows you to effortlessly adapt the lighting to complement your seasonal decor. With the DEKOR RGBW system, expect vibrant and welcoming lighting that elevates the ambiance of your deck or patio. We have designed our RGBW cabling with an advanced NexGen 3-wire system, complete with user-friendly Plug-N-Play connectors, sealing off even the harshest environments. Our range of cable lengths includes options from 20 inches to 20 feet, providing flexibility for various applications. Control options have never been more convenient with the COLORKONNECT WIFI controller from DEKOR. Utilize our custom app for a more seamless experience. Our app offers preset buttons and a color wheel, making it incredibly easy to select any color of your choice. Enhance your outdoor spaces with unparalleled brilliance and versatility. Experience the allure and sophistication of the DEKOR RGBW lighting system. For more information about our products, visit our website. About DEKOR At DEKOR, we are dedicated to providing innovative lighting solutions that combine performance, convenience, and aesthetic appeal. Our commitment to excellence is unwavering, with customer satisfaction at the forefront of everything we do. For more information, please visit www.dekorlighting.com. Sophia Powerssophia@dekorlighting.com303.991.2285
Read moreThe Art of Indoor Lighting & Outdoor Lighting: A Fresh Start for the New Year
As December advances and we eagerly await the dawn of a New Year, it’s the perfect time to infuse your living spaces with a sense of elegance and ambiance. Lighting, often underestimated, possesses the remarkable ability to transform the atmosphere of your home, both indoors and outdoors. At DEKOR Lighting, we understand the pivotal role that lighting plays in creating a welcoming and enchanting environment. In this blog, we’ll delve into the art of indoor-outdoor lighting and how it can inspire your decor for the upcoming year. Elevating Your Outdoor Space with Outdoor Lighting Your outdoor spaces are where first impressions are formed, and unforgettable memories are shared. Let’s explore how our outdoor lighting solutions can elevate these areas. Recessed DEK·DOT ™ Imagine a serene evening on your beautifully lit deck or patio, surrounded by loved ones. Our DEK·DOT ™ are the key to this beautiful lighting experience. Recessed DEK·DOT ™ are discrete and energy-efficient, they can be seamlessly integrated into your outdoor living spaces, setting the stage for magical outdoor gatherings and festivities. Yard Dot LED Lights To extend the inviting ambiance further into your outdoor lighting sanctuary, consider our Yard Dot LED Lights. These LED Yard Lights fixtures not only enhance your home’s curb appeal but also provide an added layer of security. Light up your yard, pathway or walkway with our Yard Lighting to welcome your guests and proudly display your home for the holidays. Flat Post Cap Lights For those with decks or charming fences, our Post Cap Lights offer a combination of safety and warmth to your outdoor spaces. Our deck post lights come in a variety of finishes, allowing you to choose the perfect match for your style. Recessed Stair Lights Welcome in the new year with the perfect ambiance for your outdoor porches and stairways. Our Outdoor Recessed LED Stair Lights offer a world of versatility and innovation. Featuring a 30° light angle, these lights become directional with a simple housing turn. Flip them upside down for outdoor recessed LED soffit lighting, under-deck illumination, or directional closet lighting. Festive Lighting As the holiday season arrives, why not embrace the festive spirit with our Colored LED Recessed Down Lights? Adorn your outdoor spaces with these colored landscape lights to create an inviting atmosphere for your holiday celebrations, whether that be with cherry red and green, or cozy amber and blue. Transforming Your Indoor Sanctuary In your indoor spaces, lighting choices shape the mood, functionality, and aesthetics of each room. Let’s explore how DEKOR Lighting’s indoor solutions can transform your living spaces. Under Cabinet Lighting In the heart of your home, the kitchen, proper lighting is a necessity. Our Under Cabinet LED Light Bar can be seamlessly installed beneath your kitchen (or outdoor) cabinets, providing bright, energy-efficient illumination and creating a well-lit and inviting kitchen. Flex Deck LED Rope Light Get ready to light up your holidays and celebrations with our Flex Deck LED Rope Light! This versatile and adaptable lighting solution is perfect for adding a touch of magic to your surroundings. Whether you want to create a warm ambiance beneath your hardwood stairs or brighten up your staircase handrail, the Flex Deck LED Rope Light is the answer. What’s even better is that it can be customized to your desired length for all your unique projects. Let your imagination run wild and illuminate your space with endless possibilities! Infinite Lite LED Light Strip The name says it all, Infinite Lite LED Light Strips offer limitless possibilities to illuminate your indoor spaces. These slim and flexible lights, available individually, can be seamlessly connected end to end, allowing you to craft bespoke lighting configurations. Transform your living room into a cozy retreat, highlight your bookshelves, or create an enchanting ambiance in the bedroom– the Infinite Lite is your key to endless creativity. Indoor Petite Post Lamp Kit These adaptable Petite Post Lamp fixtures, with a full 36° rotation, can be strategically placed indoors to enhance various areas. Brighten your fireplace to create a warm and inviting atmosphere, make your cabinets shine with practical brilliance, or highlight the contents of your entertainment center with precision. With a light angle of 35°, you have the power to customize your lighting experience effortlessly by adjusting the direction of the light within its mounting hole. As we look forward to a new year, remember the importance of sustainable and energy-efficient lighting. All our LED lighting solutions are designed with energy efficiency in mind, offering cost savings and a reduced environmental impact. DEKOR Lighting is committed to bringing you the best in indoor and outdoor lighting solutions, with products featuring exquisite designs built to last. As you prepare to welcome the new year, consider the impact that well-lit, beautifully decorated spaces can have on your daily life and well-being. So, as you embark on your journey to revamp your home for the new year, explore our wide range of indoor and outdoor lighting solutions. Let 2024 be the year where you make your living spaces more beautiful, inviting, and energy-efficient with DEKOR Lighting. Here’s to a fresh start, a bright future, and the art of indoor-outdoor lighting!
Read more
Elevate Your Deck and Patio Projects with DEKOR® RGBW
DEKOR® RGBW Color Changing System Welcome to the DEKOR® RGBW color-changing lighting system. Our dedicated team at DEKOR® invested over a year in crafting the ideal system, which boasts a remarkable 46% increase in brightness compared to competitors. Our system provides a comprehensive spectrum of colors, including vibrant options such as RED, GREEN, BLUE, PURPLE, WHITE, and many more. Notably, the white color is independently controlled, ensuring a pure and crisp illumination without the blending of colors as seen in other manufacturers’ products. Built into our connectors is a signal booster, seamlessly repeating the signal to maintain consistent brightness and true color accuracy from the first light to the last. This feature ensures that your entire project is uniformly illuminated. Elevate the ambiance of your deck or patio by effortlessly changing the light color theme to complement the season. With DEKOR®, experience nothing short of a vibrant and welcoming atmosphere. The DEKOR® RGBW cabling system not only ensures convenience but also adds a touch of brilliance and versatility to your outdoor spaces. FAQs Is your RGBW lighting system made in the USA? Yes, DEKOR® manufactures all circuitry in Denver, CO providing excellent quality. How do you dim the lights and change colors? DEKOR® offers a COLORKONNECT WiFi controller and through the app you can dim the lights, change colors, and set schedules. You may also control light colors with dimming capability manually on the front face of the COLORKONNECT WiFi device. Can you control the lights from anywhere in the world? When using the COLORKONNECT WiFi controller app provides you the ability to control your lights regardless of where you are located. What is the 3W4PORT splitter/repeater? The 3W4PORT splitter/repeater has two functionalities: the splitter is used to connect the power wire and the three additional ports for 2–3 lights based on your lighting plan. The repeater is to be used every 20’ with long cable runs and at the light connections to enhance the signal creating pure colors from the first light to the last. What type of connectors do you offer? DEKOR® offers a simple 3W4PORT Plug-N-Play system with various cable lengths to make the install easy in any application. How do I change the colors if I do not have my phone? You may change colors and dim the lights manually on the COLORKONNECT device. Can I have multiple zones to create colorful patterns? Yes, with the use of two or more COLORKONNECT WiFi controllers and wiring two or more zones will deliver different light color patterns. How many lights may I put on one zone? You may power up to 60-watts of light usage or 28 individual lights. Why should I buy DEKOR® RGBW system over the competition? Our lights are 46% brighter and we have a dedicated pure white channel. What cable lengths are available with your 3-wire Plug-N-Play system? We offer a variety of lengths for any application—20”, 5’, 10’ and 20’. If I already have the non-RGBW DEKOR® lighting system, can I add the RGBW DEKOR® lighting system? Yes, you can add to your current non-RGBW DEKOR® lighting system by adding RGBW lights! While the non-RGBW DEKOR lighting system is a 2-wire direct current system, and the RGBW DEKOR lighting system is a 3-wire direct current system, you are able to integrate both systems by creating a separate zone. Either using a splitter running from your current transformer or upgrading to a 100 or 200 watt transformer, which has more than one output from the transformer, you can create an additional zone or zones. Please call us if you need us to walk you through this! Does the transconnect cable work with your RGBW system? The transconnect cable is for our standard DEKOR® Lighting 2-wire lights. The COLORCONNECT WiFi controller is a 3-wire system. The male-to-male cables come in lengths of 20”, 5’, 10’, 20’ are to be used to connect the COLORCONNECT WiFi controller and then to your first light. Do you include the transconnect cable with every transformer? For our RGBW system: The 36-watt and the 60-watt transformers will include one (1) 20’ 3WPNP male-to-male cable. The 100-watt transformer will come with (1) transconnect cable and (1) 20’ 3WPNP male-to-male cable. The 200-watt transformer will include (1) 20’ transconnect cable with two lead wires and (1) 20’ 3WPNP male-to-male cable. Can I use the 6-port splitter at all in my design, along with repeaters? The 3W4PORT splitter/repeater may only be used with the RGBW system. The 6-port splitter is a two wire and can only be used with our standard DEKOR® Lighting system. Can I use the Y-Splitter with the RGBW system? No, you cannot use the Y-Splitter with the RGBW system. The Y-Splitter is for a 2-wire system. RGBW is a 3-wire system. If the transformer is a 100watt, you would need one COLORKONNECT for each leg. RGBW COLORDOT LEDs The DEKOR® RGBW cabling utilizes an advanced NexGen 3-wire system equipped with user-friendly Plug-N-Play connectors, an O-ring, and a locking collar designed to seal off even the harshest environments. Connecting them is a breeze, ensuring a hassle-free experience for users. We offer a range of cable lengths, including 20 inches, 5 feet, 10 feet, and 20 feet, providing flexibility for various scenarios. Additionally, our 4-port splitter allows you to connect multiple lights in a given area with ease. Electrical LED Type: Cree High Performance LEDs 50/50 Neopixle Light Output: White 29 Lumens, Colors 11 Lumens on average LED Colors: RGBW FULL COLOR SPECTRUM Watt Usage: 2.05W Voltage: 12VDC Controllable: Yes, compatible with DEKOR® COLORKONNECT WIFI Controller Safety and Warranty Waterproof: Weatherproof, not designed to be installed underwater. Approvals: ETL coming soon. Warranty: Please visit our website for the most up-to-date warranty information. Shop our RGBW collection
Read moreDeck the Halls with Colored LED Magic: Holiday Lighting Ideas from DEKOR
With the holiday season quickly approaching, we’re thrilled to share some festive holiday lighting ideas that’ll have your home shining brighter than a Denver star on a clear night! When it comes to creating that warm and welcoming holiday atmosphere, there’s no better way to do it than with colored LED lighting. Today, we want to discuss high-quality LED lighting solutions for the holiday season and show you how to transform your space into a winter wonderland. So grab a cup of hot cocoa and let’s get started! Front Porch Elegance First impressions matter, especially during the holiday season, and your front porch is the perfect place to start. DEKOR offers a range of colored LED lighting options that will make your porch the envy of the neighborhood. Consider the DEKOR Colored LED Recessed Down Lights for a soft, inviting glow. These lights are small in size yet provide a lot of light– and are perfect for porches and railings. From classic red and green to frosty blue or amber, you can choose which color best suits the ambiance you’re after. Curb Appeal Magic To give your home that “Home for the Holidays” charm, don’t forget about the outside spaces. DEKOR offers “Puck Colored LED Landscape Lights” that are perfect for illuminating your home’s exterior. They can be strategically placed along walkways and architectural features, creating a captivating display that’s sure to impress your guests. These lights are durable and designed to withstand the elements, so you can enjoy them for many holiday seasons to come. A Dazzling Pathway Nothing sets the holiday mood like a well-lit outdoor space. Consider incorporating DEKOR’s “Sidewalk Pathway Light” for a magical entrance. These versatile and stylish pathway lights are designed to not only enhance the aesthetics of your outdoor area during the holidays but also provide safety and guidance to your guests. The sleek and modern design of these lights adds a touch of sophistication to your landscape while emitting a warm, inviting glow. Made with durable materials, they can withstand various weather conditions, ensuring that your pathway remains beautifully illuminated throughout the holiday season. Festive Foliage Let’s not forget the greenery! DEKOR’s “LED Colored Outdoor Driveway Lights” are perfect for lining your walkways or driveway. They’re available in four different colors, so you can match them to your overall color scheme. The soft, inviting glow of these lights will guide your guests to your front door and create a whimsical atmosphere. You can even get creative by placing them in planters or among your outdoor holiday decorations. Magical Mantels Now, let’s head inside for some indoor holiday magic. The mantel is the heart of any home during the holidays, and DEKOR’s “Recessed LED Down Lights” are an ideal choice for creating a cozy, warm ambiance. With a range of different finishes, you can install these LED lights below your mantel to accentuate your holiday décor. They even come in a convenient four pack to ensure you have the perfect amount of illumination to make your holiday space truly enchanting. Holiday Tablescapes For an unforgettable holiday dinner, consider adding some twinkling charm to your table settings. DEKOR’s “LED Puck Lights” are small, portable lights that can be tucked among your table centerpieces or scattered around the room. These are colored LED lights– no lens or filter– to ensure the truest hue of the color possible. Imagine the delight on your guests’ faces as they dine by the soft, colorful glow of your holiday table. Bedroom Bliss Extend the holiday spirit to your bedroom with DEKOR’s “LED Dek Dots“. Though they can be used for many outdoor areas, bring the holiday lighting indoors! These lights can be installed beneath your bed frame, creating a warm and inviting atmosphere that’s perfect for winding down during the holiday season. Whether you’re enjoying a quiet evening by the fire or reading your favorite holiday book, these lights will add a touch of magic to your space. Conclusion There you have it, folks – holiday lighting ideas that are sure to make your home the talk of the town this season. DEKOR’s range of colored LED lighting solutions offers endless possibilities for transforming your space into a winter wonderland that any homeowner who appreciates a “Home for the Holidays” curb appeal, would be proud of. So, whether you’re decorating your front porch, sprucing up your mantel, or creating a festive dining experience, remember to infuse your home with the warmth and charm of colored LED lights. Happy holidays!
Read morePower-Saving Ideas for Landscape Lighting
Your home may have beautiful interior décor, a well-maintained lawn, a flower bed plantation, and a backyard barbecue. However, it’s incomplete without proper landscaping and garden lighting. Outdoor landscape lighting adds charm, functionality, and safety to your home. When selecting landscape lights, you should choose energy-efficient options to save on your electricity bills. You can add energy-efficient lighting to your property in a variety of ways. Luckily, you can always find light fixtures suited to your landscape’s unique requirements that save on energy bills and help your family stay safe while having a fun time outside. Want to know the best power-saving ideas for landscape lighting? Read on! 1. Install Energy-Efficient Bulbs Nowadays, you have many more options than incandescent lights to illuminate your indoor and outdoor areas. The evolution of modern technologies has led to the emergence of LED bulbs, which are ten times more energy-efficient than the previously available options. They illuminate more extensive areas with an energy-saving bulb that casts a broader light. For both outdoor and indoor lighting requirements, LED, Compact Fluorescent (CFL) bulbs, and halogen lights are popular choices. LED lights consume much less energy but require unique installation because of different energy requirements. They need 12 volts rather than 120. CFLs are four times more effective than incandescent bulbs. As the light dims when the weather gets cold, you should protect the fixtures from such weather. Metal halide is another power-saving bulb that emits a natural-looking glow and is 3 to 4 times more effective than incandescent bulbs. Because the bulbs need warmth, they are inappropriate for any type of cold weather lighting in a yard. The energy-efficient bulbs have many benefits for the exterior landscape design, such as crisp lighting tint, cool bulbs, and long warranties. Pathway lights, such as the Empress LED Pathway Light, tiki-style torches, garden lights, such as the LED Landscape Spotlight, and outdoor lanterns, are some of the most popular choices for landscape lighting. 2. Choose Low Voltage Bulbs Low-voltage bulbs are ideal for landscape lighting because they conserve energy and lower energy bills. If you install incredibly bright lights, they may irritate your neighbors. The guests on your property may find it challenging to stay safe. The cars driving nearby your property also have accidents because of the flashy lights. Fifteen watts is usually enough for several landscape lighting implementations. 3. Invest in Motion Sensors Security is one of the key reasons behind landscape lighting. You can do that by installing motion sensors, since this helps save energy. They activate once they sense motion and stay on until the movement stops. Such lighting also helps in boosting security by alerting you and your neighbors as soon as someone is in your yard. Motion sensor lighting can be a great addition to the lighting framework surrounding your property’s driveway, gates, doors, and corners. You should position them a little higher so they can cover a larger area. 4. Maintain a Proper Light Height Think about how high you want to install your outdoor landscaping lights– the height dramatically impacts the light’s energy efficiency. The lamp distributes evenly if you install lights of different sizes in a yard. That way, you don’t need to install more lights to compensate for the dark areas in your yard. The perfect landscape lighting is about placing different lights at different height levels to illuminate every corner of your home exterior. 5. Set Timers On Never keep your lights on when lighting isn’t required, as this will unnecessarily increase your energy bills. When you use your landscape lighting only as needed, you’ll have more control over when lights shine and therefore, the amount of energy they use. Set timers on some, or all, of your landscape lights so you don’t need to stay home to switch them on or off. You can program a timer system to switch lights on when required, or use a daylight sensor, which monitors the sun’s rise and set. Using an intelligent hub to operate lights and save energy is even better. We highly recommend investing in the DEKORKONNECT™ WiFi Light Controller if you are looking to control your lights when you’re at home or away. With this fancy device, you can even set schedules for your lights, see the status of lighting zones, and change the brightness! 6. Add Solar Lights to the Landscape Do you live in a location that tends to stay sunny most of the time? You could opt for solar lights, which are an eco-friendly and power-saving option. Such lights will soak up all the light during the daytime, which will power them all night if installed in the sunniest parts of the yard. Solar lights may not be the perfect solution, depending on the outdoor lighting requirements. It may take many days to accumulate enough energy. The light emission can be dimmed more than electric lights. Outdoor solar lighting is usually free-standing and utilizes solar cells to energize lights separately. Solar stake lights are available in various styles, shapes, and sizes. They are widely used in garden beds and pathways. Some are designed more like lanterns or lamp posts, while others are mounted on fences and walls. Thus, you can install solar lights at any place you want. Once you select a solar light, check how long it functions during the night to confirm if it fulfills your requirements. Solar lights are a lucrative option for navigation or decorative lighting purposes. They can also add security to your property if installed correctly. 7. Planning Time To save the maximum amount of energy in landscape lighting, you must have a proper plan. When you have a well-laid-out plan, you can decide where to install low-energy lights, use elements like motion sensors, and position solar lights to get maximum sunlight. Draw your landscape and any other aspects to create a lighting plan. Work on those elements in your property that you want to enhance. Focus your energy on the house framework, external entertainment areas, pathways, trees, flower beds, and garden. Decide which kinds of lighting options work best with the individual aspects depending on decoration, size, and required amount of illumination. You should consider the overall impression given by the landscape lighting plan. If you’re really stuck, we’re here to help. We offer a free project planning service to help our customers reach their lighting landscape goals. Our Customer Care Team has years of both interior and exterior lighting design experience and will happily guide you on your next lighting project. Power-saving landscape lighting can always be a wise investment to boost your property’s visual appeal and security, yet also help save on energy bills. Dekor Lighting offers a diverse collection of lights for almost all types of landscapes.
Read moreTop Lighting Ideas to Spruce up Your Deck
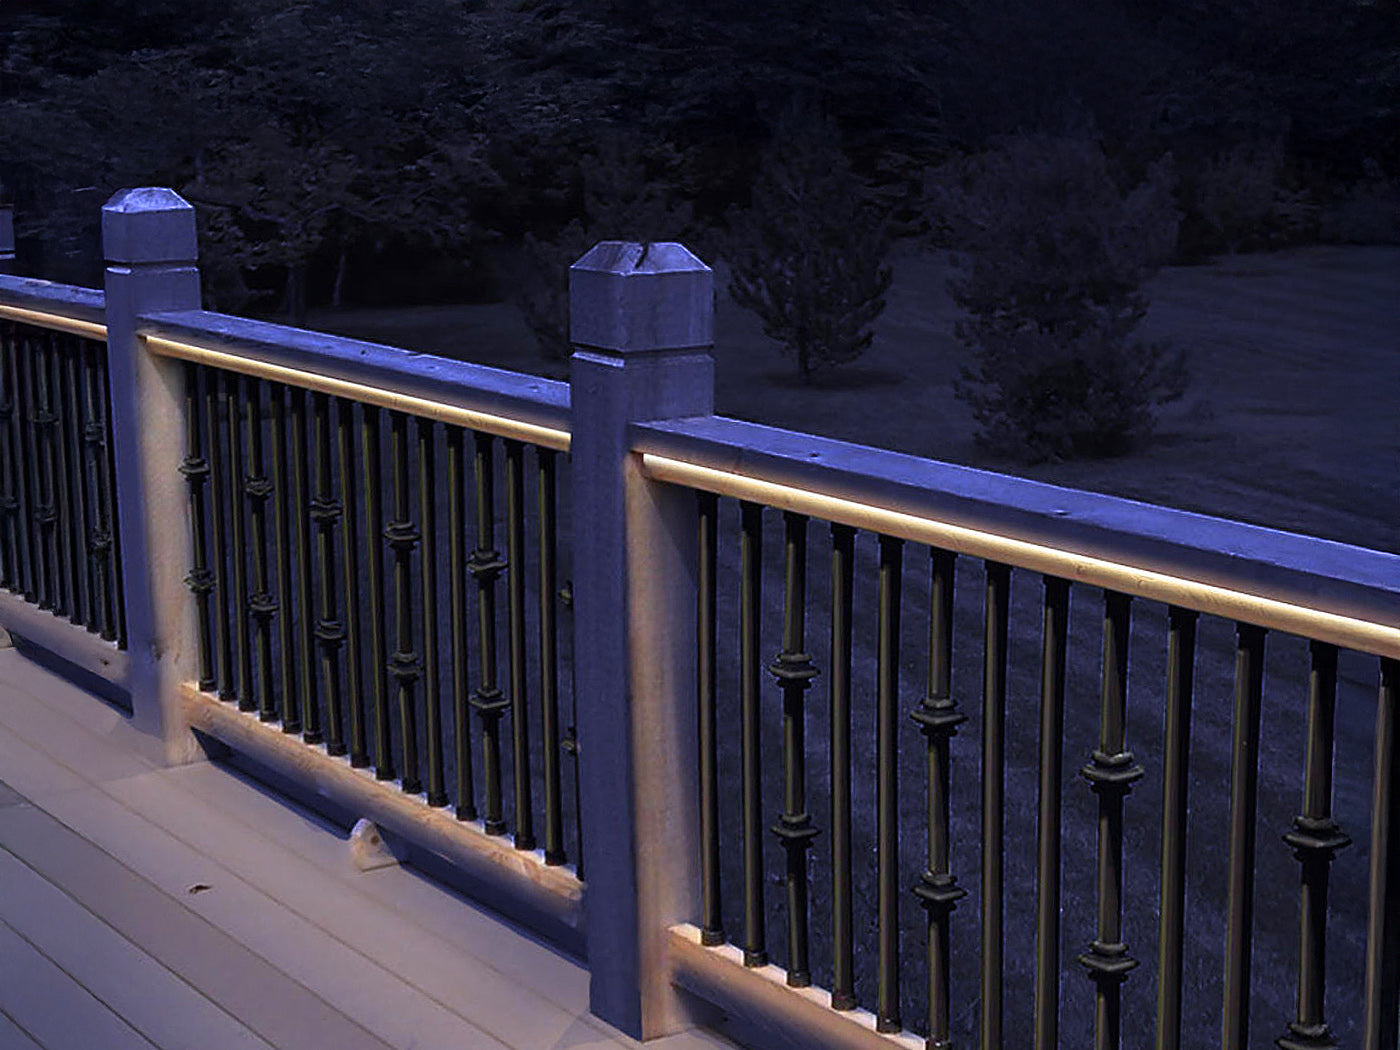
Be it dinners with loved ones, spending the night under the stars, and barbeque nights with your friends—your outdoor deck is where your summer memories are made. Perfectly illuminating your deck for the occasion will only add to the magic. Whether you’re building a new deck or redoing an old one, lighting plays a vital role in setting the mood. Outdoor lighting helps your guests move around safely and instantly gives your deck a done-up look. Keep reading to find terrific ways to decorate your deck and shine on! Top Deck Lighting Ideas When choosing the proper lighting, the first step is to decide the type of lighting you need. Temporary, semi-permanent, or integrated are your options. Temporary ones like LED candles are battery-operated lanterns that can be moved as required; semi-permanent ones need to be fixed like a built-in but can be moved whenever necessary. Built-in lights are embedded onto the porch or the deck, and a lot of work goes into moving them. Whatever type of lighting you choose, these lighting ideas are worth a try. Style It with Railing Lights Railing lights—built-in or strung along the perimeter—are a great way to define your deck. It can also illuminate areas of your deck where people frequently gather. There are deck post lights and under the rail lights that can also be used to add appeal while still providing enough light to move around safely. Mount It on the Walls Wall-mounted lights are mainly used to illuminate the pathways and access points. They typically can be operated from the inside, making them easily accessible before going out to your deck. There are many options for wall-mounted lighting; you can select one that complements your overall decor and serves your purpose. Spotlight Your Landscapes When guests are relaxing on your deck, they are bound to look around; this is the best time to show off your landscaping. Add spotlights to the landscapes, the outdoor dining area, grilling point, plants, or other areas of your deck. Don’t let your hard work and creativity sit in the dark! Add Some Fun with Overhead Lighting Do you have a pergola, trellis or arbor? Lift the spirit of your outdoor space instantly with overhead lights. Create a warm ambiance using LED lights to complete the relaxing and welcoming feel of your home. Keep wires out of sight with our lighting options and wire covers that are waterproof, exceptionally durable, and backed by a lifetime warranty when using our transformer. Please read our lifetime warranty for full details. We offer a variety of overhead lighting, including flood lights, rope lights and strip lights to transform any outdoor space you have. Step into Safety with Stair Lights Well-lit stairs will add to your deck’s appeal and make it safer to use. Avoid the stumbles and trip-overs with these recessed step deck lights. Before buying your recessed step lights, find out from the light manufacturer if the lights are safe to be walked over. Even if your deck is already built, installing these stair lights is still possible. Our Dek Dots are the perfect addition to help create the atmosphere you’re going for! Hang Them to Make an Easy Decor Pendant lights that make a decor statement and provide enough light will be a good idea if your deck has a roof or is a pergola. Choosing a light that compliments the theme and gives a chic look will be the best option. There are also some cool ones with automatic dimmers, heaters, and Bluetooth speakers. Have you thought of adding a dramatic chandelier? Want Some Cool Pool Lights? While buying lights for the pool deck, make sure you check its water tolerance. You need to check the lights’ IP rating code, which will give you a good idea of how much water, dust, and debris the light can withstand. You could also use up-down lights and create a bow-tie pattern by the pool. If you are super motivated and want to make this a fun weekend project, you could create outdoor lighting decorations to make your deck the place you love the most. You could use items like candles, mason jars, tea lights, led bulbs, and other household items and get creative. Now that you have a good idea about the types of outdoor lights and how you can use them, there are a few things you should keep in mind before buying them. Things To Consider Before Buying Deck Lights Warranty Outdoor light fittings are subject to harsh weather conditions and might need maintenance or replacement. Having a warranty will ensure that the supplier takes care of the damages. Durability LEDs are the best choice when it comes to outdoor lighting and durability. It reduces frequent replacements and maintenance costs as well. Outdoor Rating Look for terms like ‘waterproof’ or ‘suitable for outdoors’ when buying outdoor lights. Checking with the manufacturer is a good idea when you are not sure. Wattage & LED Lighting Consider the wattage of the bulb while buying outdoor lighting. Low wattage incandescent, fluorescent or halogen bulbs are suitable to be used for decoration lighting . However when it comes to efficiency, LED bulbs should be your go-to! When you provide power to an LED light, more energy is converted to light rather than heat, creating a brighter light at a lower wattage. This results in long-lasting, energy efficient lighting, that ultimately saves you money in the long run. Color and Style Before buying the lights, you need to decide if you want warm ambient lighting or fun, bright, peppy lighting. It’s common to use warm colors for light to create an inviting and cozy look. Just go with what you want; the market is full of amazing choices. Build a Theme When shopping for lights and fixtures, make sure to buy the ones which follow a theme and suit the overall look of the house. Having a unified look will make your deck look more attractive. If you are looking for a place to buy quality products with easy installations and extended warranty periods, Dekor Lighting is the place for you. Dekor Lighting is a one-stop shop for all your lighting needs. Contact 1-800-258-0344 or click here to place an order. It’s time to deck it up with lights!
Read moreUplighting vs. Downlighting: Which is Better? | DEKOR® Lighting
If you’re planning a new lighting project for your home, you’re probably wondering which types of lights will work best for your space. You may have heard of uplights and downlights, some of the most common, broadly available types of lighting fixtures. But which one is better? We’ll walk you through how both uplighting and downlighting work and the best uses for each. What is Uplighting? Uplights are usually installed at the ground level and shine upward. Usually, they are installed to illuminate a specific feature, whether that’s a tall tree or an architectural feature of your house. They add a sense of depth to your landscaping at night because they create shadows against the walls and surfaces around your yard. Uplights are ideal for areas where you want to emphasize a specific architectural or landscaping feature. Uplighting is usually not the best option for seating areas or lighting walkways. It has a dramatic effect and shines brightly upward, which could create glare in certain situations. Types of Uplights Not every uplight is the same. There are many types of lights that qualify as uplights, including well lights, directional lights, and recessed lights. A light fixture is considered an uplight as long as it is installed near the ground and shines upward to create a focal point, so there is a significant amount of flexibility in the effects you can achieve with these lights. Well Lights A well light is a small, puck-like light that can be installed directly on landscaped surfaces like grass, dirt, and gravel. DEKOR®’s Well Landscape Uplight Kit lights up small features and structures, so it’s perfect for bushes, flower beds, small trees, retaining walls, and any other short structures you can think of. Well lights are subtle, blend in with their environment, but don’t usually cast light very far, so if you are looking to uplight columns on your house or a tall tree, you may want to look at one of our other suggestions. Directional Spot Lights If you’re looking for something that will cast light on a tall structure, directional lights may be your go-to. Powerful directional lights can bring architectural features to life, add dimension to tall trees, and light up the beautiful details of your outdoor space at night. For example, the Telescoping Landscape Spotlight Kit from DEKOR® adds warm, natural light to your yard with a telescoping attachment that helps you control the direction of the light. Recessed Lights Recessed lights are incredibly versatile. So much so that in this instance, they can be used for either uplighting or downlighting. DEKOR®’s Outdoor Recessed Up/Down Lights are the ideal purchase if you’re trying to add some uplights to your deck or patio area. This type of lighting is usually meant to be installed in wood, composite materials, concrete, or stone. They are not meant to be landscape uplights, so keep this in mind when planning your project. What is Downlighting? Downlighting (also sometimes referred to as soffit lighting) shines downward to add visibility to your yard and outdoor living spaces. A downlighting effect is achieved by installing a light at a high vantage point, like in a tree, on a ceiling, or beneath the eaves of your roof. Unlike uplighting, downlighting is the ideal type of light to use in social gathering spaces. It also can light up short landscaping features – like flowers, shrubs, etc. – which brings to light the detail in your favorite garden accents. Types of Downlighting A light installed high up will provide landscape lighting for larger spaces. A trendy option for downlighting is called moonlighting: install a light high up in a tree to mimic the natural light of the moon as it casts light on your patio or landscaping. Downlighting can also add security and safety to your yard with directional flood lights and spot lights. Recessed Downlights Recessed lights can do anything, from uplighting to downlighting. The only difference is the place where you install the light and the resulting effect. Use the same DEKOR® Outdoor Recessed Up/Down Lights we mentioned in the uplighting section of this article, but install them on the ceiling of an overhang or under the eaves of your roof for warm, comfortable downlighting on your deck, patio, or front porch. Flood Lights and Spot Lights Flood lights shine at a broad angle from above, so they add a soft glow to a wide area outside your home. Spot lights, on the other hand, provide a much more concentrated, narrow stream of light. Both are great options to provide light to the front of your house or dark corners that need illumination. For this type of downlighting, we recommend either the LED Soffit Flood Light Kit or the LED Soffit Spot Light Kit. Indoor Downlighting We’ve been discussing outdoor lighting this whole time, but downlighting is also a common and important type of interior lighting. Most varieties of outdoor downlights are suitable for inside use as well, but the most useful and versatile are the Recessed Down Lights offered by DEKOR®. Very similar to the recessed lights we’ve already mentioned (but designed for indoor use as well as outdoor), these fixtures are meant to be installed in the ceiling, in cabinets, or in closets. Find more ideas for indoor downlighting here. Combine Uplights and Downlights for the Ultimate Outdoor Lighting Hopefully, now that you’ve read this article, you understand that uplights are not better than downlights (or vice versa). They simply have different uses. You may also be guessing that the best way to light up your property is not with one or the other, but with both uplights and downlights installed in specific areas for strategic exterior lighting. When combined in the same space, uplights and downlights create unique shadow effects that may actually look more natural than just using one or the other because it mimics the ways in which sun and moonlight shine from multiple angles. If you’re looking for more downlighting ideas, check out our blog post about the best soffit lighting ideas.
Read moreHow to Install Under Cabinet Lighting: A Guide from DEKOR®
Under cabinet lights are useful in a wide variety of applications. They light up kitchen counters and surfaces. They make it possible to see what you have on your cabinet shelves in the dark. And they’re a great way to add some indoor accent lighting to areas of your home you may not initially think to light up. There are also a wide variety of fixtures you can use to light the space inside of and below your cabinets. Strip lights are a classic solution. A light bar might also be to your taste if you’re looking for a sturdy light with an adjustable angle. Of course, you can also install disc spot lights, directional spot lights, and other light fixtures to create different under cabinet lighting effects. In this article, we’ll focus on two of DEKOR®’s most popular under cabinet lighting products: the NOSEEEM Strip Lights and our Under Cabinet LED Light Bars. We’ll walk through installation instructions for each product, step-by-step. You’ll quickly see how easy it is to install your own under cabinet lighting. How to Install Under Cabinet Strip Lights The versatile NOSEEEM Strip Light can be used in a number of applications. Here, we’ll talk about installing it under cabinets, but you can also install it inside cabinets, on top of cabinets, on steps, on the underside of stone caps, indoors, outdoors, you name it. Follow these steps to install strip lights under your cabinets. Determine the precise positioning of the first NOSEEEM Light Strip under your cabinet before you start. Mark the intended location of the screws. Use at least 3 screws per light strip. Pre-drill screw holes with 1/16″ drill bit. Attach the mounting bar with included adhesive strip ONLY unless conditions require you to use screws. Slide the light strip onto the mounting bar. Secure the light strip with small sections of the retaining cord. Repeat the steps with each additional section until you have installed the desired length of light strip. If desired, you can cut light strips to fit custom lengths, but this will terminate power at the end of the light strip. Connect the first NOSEEEM Light Strip to the transformer or power supply with a cable. Then connect every additional light strip with Plug N Play cables. If you’re more of a visual learner, watch this installation video for DEKOR NOSEEEM LEDs. How to Install Under Cabinet Light Bar Light Bars are another classic option for under cabinet lighting. While they can’t be customized quite as easy as strip lights to fit unique lengths and small spaces, they do come in a variety of different sizes. DEKOR® sells light bars in both 12″ and 20″ sizes, both available for individual purchase and in kits. Follow the next steps to install your light bar under a cabinet. Decide whether or not you’d like to install a dimmer and/or motion control for your light bar. The 12″ Light Bar Kit and the 20″ Light Bar Kit both come with a dimmer and a motion control device included. Determine the desired location of your transformer. You’ll want easy access to the transformer in case you need to service it for any reason. You may want to pre-drill holes for the cables or wires to run through the bottom of cabinets or between cabinets. Each light bar has a mounting bracket. Open the bracket to 90 degrees. Then attach the mounting bracket to the underside of the cabinet with included screws. Plug the light bar into the outlet or power supply, then tip the bracket to your desired angle. The mounting brackets are adjustable and can ratchet to shine exactly where you want them to. DEKOR®‘s Top-Quality Under Cabinet Lighting DEKOR® is the best option for your under cabinet lighting needs. Our LEDs are perfectly suited for indoor use: you will be amazed by the cabinet lighting projects you’ll be able to complete with our products. We offer not just strip and light bars, but also spot lights, disc lights, and more.
Read more